Introduction
BSIDES CTF 2019 was hosted by Google and Facebook in San Francisco during the BSides Conference. Teams from all over the world could compete, but the prizes can only be claimed by teams who have their member(s) present physically in the BSIDES conference. The duration of the event was 32 hours. Although, the CTF ended during a school day (i.e Monday). I still booked my tickets from Friday to Tuesday, specifically for the CTF. I got to meet a lot of cool folks who are in the security community & other fellow CTF’ers. The overall experience was awesome.
It is worthy to mention that our team finished 1st in the CTF and went home with Hak5 kits whereas Perfect Blue got 2nd place and OpenToAll got 3rd place. Kudos to them.
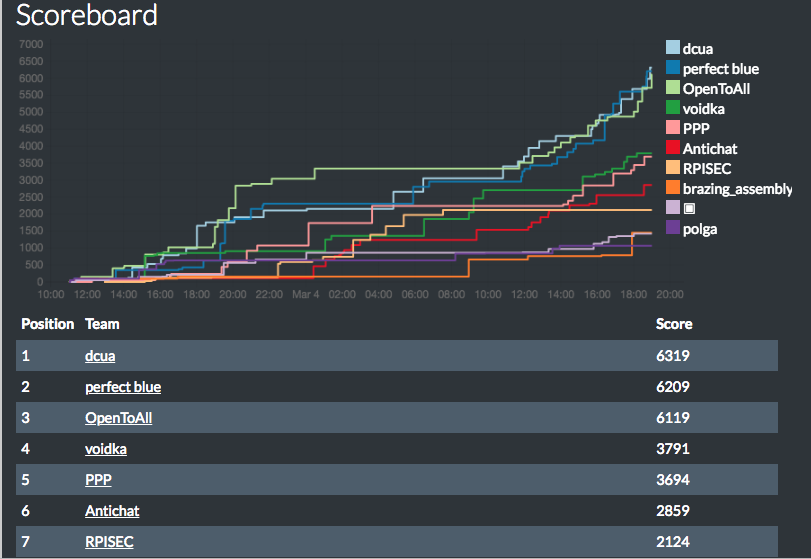
The competition was close, and last hour end-game was equivalent to a roller-coaster ride. It is a clear indication that CTF’s can be as interesting as e-sports. 🙂
This writeup will only outline Android challenges I attempted and solved during the CTF. Overall, I solved/engaged with team-mates on around 15 challenges. Although, I won’t be doing formal write-ups for all of them due to time constraints. But, you may want to see the code or short versions here.
If you are new to Android Reversing, I recommend checking out my H1-702 Write-ups which is a very in-depth guidance. Also, special thanks to the authors Niru for the android challenges, David for the web, Ron, Bryan and Brandon.
Without further ado, Let the pwnage begin!
You can jump sections:
Blink (50 points)
Get past the Jedi mind trick to find the flag you are looking for.
We are provided an APK file. First thing I do is to check the file is really an APK or not using file. Alrighty, the file is indeed an APK file. I load the file in JADX. First thing to check whenever you load an APK file is to look at AndroidManifest.xml file.

We can clearly see an activity being MainActivity and a statically registered Intent filter. The package name is com.example.blink which contains java code which are responsible for performing actions. MainActivity sets the layout by importing activity_main which is placed inside res/layout/activity_main.xml which uses an drawable logo referenced as meme. Hence, it does nothing except trolling. But, there is another file called r2d2 (Now, I’m getting some star-wars vibe) , there is a variable imageBytes which contains a base64 chunk with content-type image/jpeg. So, let’s copy and paste in chrome which gives us an image (or you can use python’s base64 library or some online website)

Hence,
Flag: CTF{PUCKMAN}
Yay Or Nay? (200 points)
Keep track of places you would love / hate to see, by dropping markers with a simple click. Try YayorNay v1.2 today!
:::: Updated README :::: v 1.0 – Added short press, Yay support – Fix stability issues
v 1.1 – Added long press, Nay support – Add labels
v 1.2 – Populate from DB – Save to DB
To-do – Fix stability issues – Bug fixes – Implement feature to view by day
(Not the standard flag format, case matters!)
This application needs Google Maps (specifically I should have GApps on my emulator). There is a process to install GApps on genymotion. I had couple of emulators with GApps already installed but they were lower than the SDK Version the application supported and I didn’t wanted to put time in patching the application. Sometimes, it may break on lower versions. Hence, it’s risky. I used a real android device for this, enabled the debugging mode, Installed the apk and entered the adb shell.
Once, the application is loaded, it will have different markers on the Google Map at multiple location. The database is stored at
/data/data/com.example.yayornay/databases/Location.db
which I adb pull’d.
The database looks like

First column is date where the marker was placed on the map. 2nd and 3rd are Latitude and Longitude respectively denoting co-ordinates of where the marker was place and the final column denotes color type on the marker – Either 120 or 0.
The logic is right in the MapsActivity.java which is self explanatory
   while (it.hasNext()) {
                Location location = (Location) it.next();
                LatLng temp = new LatLng(location.latitude, location.longitude);
                float color = 120.0f;
                String label = "Yay!";
                if (((double) location.color) == 0.0d) {
                    color = 0.0f;
                    label = "Nay!";
                }
                this.mMap.addMarker(new MarkerOptions().position(temp).title(label).icon(BitmapDescriptorFactory.defaultMarker(color)));
            }
The Yay’s are 120 and Nay’s are 0. Now, it is given that flag is in non-standard format which means it doesn’t follow CTF{..} . I tried couple of things first such as forming binary / Morse code with no success. Next, I clubbed all the markers by date. We can utilize a trick – that is to create multiple CSV and put import it OR you can use another simple alternative which manages most stuff for you.
So, after creating that, I viewed the map by different dates. 8th February was very interesting. The marker colors denotes Yay or Nay (aka 120 or 0)

So, we have some sort of symmetry which I couldn’t notice on any other dates. This can be divided into 3×2 matrix which is Braille. Also confirmed by one of my team-mate. Now, the real struggle just started.
We can treat the red marker as black dot and blue marker as white dot & repeat the process for the Braille charset. It has to hit something meaningful in either of those. I used the charset which is here. Apparently, it recovered me a bunch of garbage string denoting I was doing something wrong. So, it was quite apparent that the characters other than alphanumeric were meant to be discarded. So, only ASCII should make a meaningful flag.
I came to a conclusion that the blue markers/pins were black dot and red markers/pins were white dot. A more closer recovery I had was Z3LDA which unfortunately failed. Apparently, I forgot to see the hint which says casing matters. I tried recovery again and this time it hits the jackpot of 200 points.
This is how you can do modern day crop-circles which aliens figured out before thousand of years.
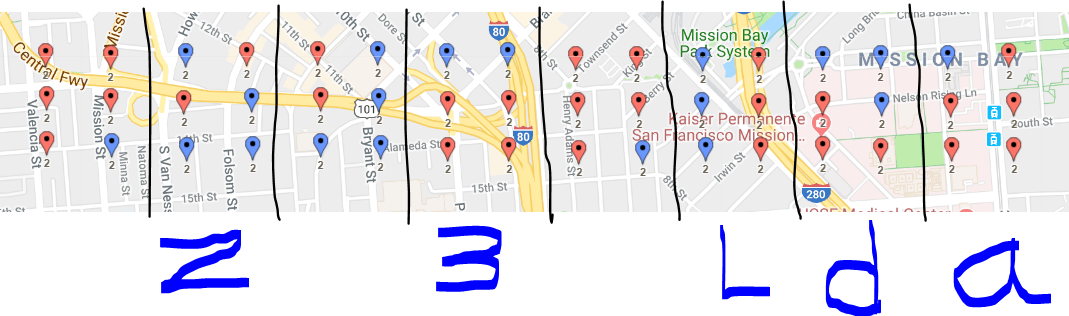
Flag: Z3Lda
Weather Companion (350 points)
A simple weather application that fetches and displays the weather. What hides within?
So, the AndroidManifest.xml had mentioned explicitly the specific SDK Version on which app is supposed to run. They are basically Android 8.0 and Android 8.1 compatible.
<uses-sdk android:minSdkVersion="26" android:targetSdkVersion="27"/>
I was on-site when I started to attempt this challenge but unfortunately my Genymotion didn’t had any android versions installed with that compatibility. That isn’t end of the road, as I could download an image but the Wifi at the conference was too slow for that. So, I initially skipped it and worked on Sequel challenge until I reached my friend’s home.
So, now I got the compatible version. So, it’s time to do static analysis first. Jadx’s decompilation was a bit broken, but still it was okay for me before I could move to other alternatives.
The MainActivity.java hints us to a.java which extends AsyncTask denoting the process will be happening at background. One function caught my eye.
 private String a() {
        String str = "";
        i j = k.j();
        if (j.h == null) {
            j.h = j.g.a(j);
        }
        g gVar = (g) j.h;
        String str2 = "weather-companion";
        String str3 = "weather.json";
        String str4 = null;

        .... Omitted for Brevity ....

}
We can do some code tracing to figure out some of the code which seems to be like Google API Java Client Service. Important variables are str2 and str3 here denoting a presence of something more is happening. Next, there is a try/catch block which creates utils object. We can trace to Utils.java which importantly uses Native Library. So, there are three functions which are defined in the Native library
    native byte[] dks();

    native long gci();

    native byte[] ss(String str, int i);
Apart from that a couple of private variables, some seems to be in base-64 encoding and one is definitely ROT-n. Now, we can again go to a.java and see the data from those private variables are using functions from Utils . A top level analysis was
Utils.a — Base64 inp / out Base64 decode iff int =0
We still have to reverse the Java code for Utils.a for i > 0 & couple of other Native functions. Before, that we need to see what the app is actually doing (i.e Dynamic Analysis) and see if we can get some information the smart way.
I loaded the APK into Genymotion and ran which showed me the Current Location, Weather, Upcoming Hourly Weather. Well, it was a weather app as expected. So how did it fetched the data. Does it stores anything into database? Didn’t seemed like it. But how about it calling some API to fetch data? More likely.
I attached Proxy (Burp Suite) to the Emulator and captured the traffic. First, I saw couple of Internal Google Server requests which was fingerprinting the Device and placing it in the User-Agent. Then I saw a request going to an Amazon EC-2 Instance. Finally,
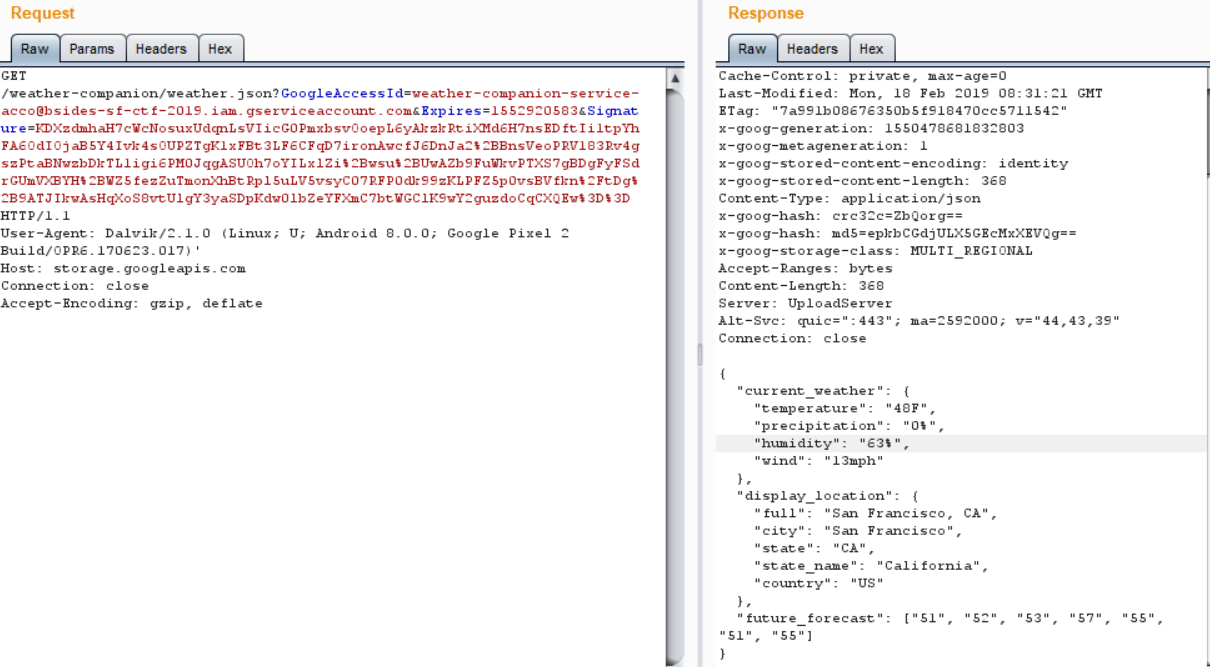
Hence, we see it is querying to http://storage.googleapis.com/weather-companion/weather.json end-point to get the data. Let’s try to visit in a browser but BUMMER we don’t have get access to that. So, Signature, Expires & GoogleAccessId fields are required which is apparently this. To sign a string, we need private key. But we never saw any request going from Mobile -> Google Server for Authentication. I assumed I was dealing with SSL Pinning here. The Utils.java makes it evident that it is responsible for the generation of the key json file and which is divided into various parts combined by StringBuilder and finally making an HttpUrlConnection.
A usual key file looks like
{
"type": "service_account",
"project_id": "[PROJECT-ID]",
"private_key_id": "[KEY-ID]",
"private_key": "-----BEGIN PRIVATE KEY-----\n[PRIVATE-KEY]\n-----END PRIVATE KEY-----\n",
"client_email": "[SERVICE-ACCOUNT-EMAIL]",
"client_id": "[CLIENT-ID]",
"auth_uri": "https://accounts.google.com/o/oauth2/auth",
"token_uri": "https://accounts.google.com/o/oauth2/token",
"auth_provider_x509_cert_url": "https://www.googleapis.com/oauth2/v1/certs",
"client_x509_cert_url": "https://www.googleapis.com/robot/v1/metadata/x509/[SERVICE-ACCOUNT-EMAIL]"
}
The parts I have is
{
"type": "service_account",
"project_id": ""bsides-sf-ctf-2019",
"private_key_id": "6dd7fc48a8b1d49edf7f03f74bc47713bec7d989",
"private_key": "-----BEGIN PRIVATE KEY-----\n[PRIVATE-KEY]\n-----END PRIVATE KEY-----\n",
"client_email": "weather-companion-service-acco@bsides-sf-ctf-2019.iam.gserviceaccount.com",
"client_id": "[CLIENT-ID]",
"auth_uri": "https://accounts.google.com/o/oauth2/auth",
"token_uri": "https://accounts.google.com/o/oauth2/token",
"auth_provider_x509_cert_url": "https://www.googleapis.com/oauth2/v1/certs",
"client_x509_cert_url": "https://www.googleapis.com/robot/v1/metadata/x509/weather-companion-service-acco@bsides-sf-ctf-2019.iam.gserviceaccount.com"
}
Other parameters are manipulated by Native Library & Utils.a . Either we can reverse those function and recover or we can do something Andronic (Derived from Pythonic). It was 6 A.M and I read the code thoroughly. One line caught my attention.
          URL a3 = gVar.a(c.a(str2, str3).a(), TimeUnit.DAYS, com.b.c.c.g.a.a(com.b.b.b.i.a(new ByteArrayInputStream(stringBuilder4.getBytes()))));
          str4 = a3.toString();
          HttpURLConnection httpURLConnection = (HttpURLConnection) a3.openConnection();
What is this doing here 🙂
str4 = a3.toString();
The code performs all those decoding and passes the control to a3 to open the HttpURLConnection . But, str4 is used to place the string representation of a3 . So, what if I hook the toString and dump the decryption. I will use Frida for that.
So, our attack vector contains 3 steps:
1.) Bypass SSL Unpinning
2.) Hook toString
3.) Monitor toString
I wrote a hooking script to automate that. I used Universal SSL Unpinning to tackle 1st step which I had already used in couple of other Pentests.
Java.perform(function(){

    // Step - 1

    var array_list = Java.use("java.util.ArrayList");
    var ApiClient = Java.use('com.android.org.conscrypt.TrustManagerImpl');

    ApiClient.checkTrustedRecursive.implementation = function(a1, a2, a3, a4, a5, a6) {
        var k = array_list.$new();
        return k;
    }


    // Step - 2

    console.log("Hooking Java");

    const StringBuilder = Java.use('java.lang.StringBuilder');

    StringBuilder.$init.overload('java.lang.String').implementation = function (arg) {
            var partial = "";
            var result = this.$init(arg);
            console.log('new StringBuilder("' + result + '");')
            return result;
    }

    console.log("Hooking new StringBuilder(java.lang.String)");


    // Step - 3

    StringBuilder.toString.implementation = function () {
            var result = this.toString();
            console.log('StringBuilder.toString(); => ' + result)
            return result;
    }

    console.log("Hooking StringBuilder.toString() hooked");

}, 0);
I save it as urlconn-hook.js & ran the script as
frida.exe -U -f com.example.myapplication -l urlconn-hook.js --no-pause
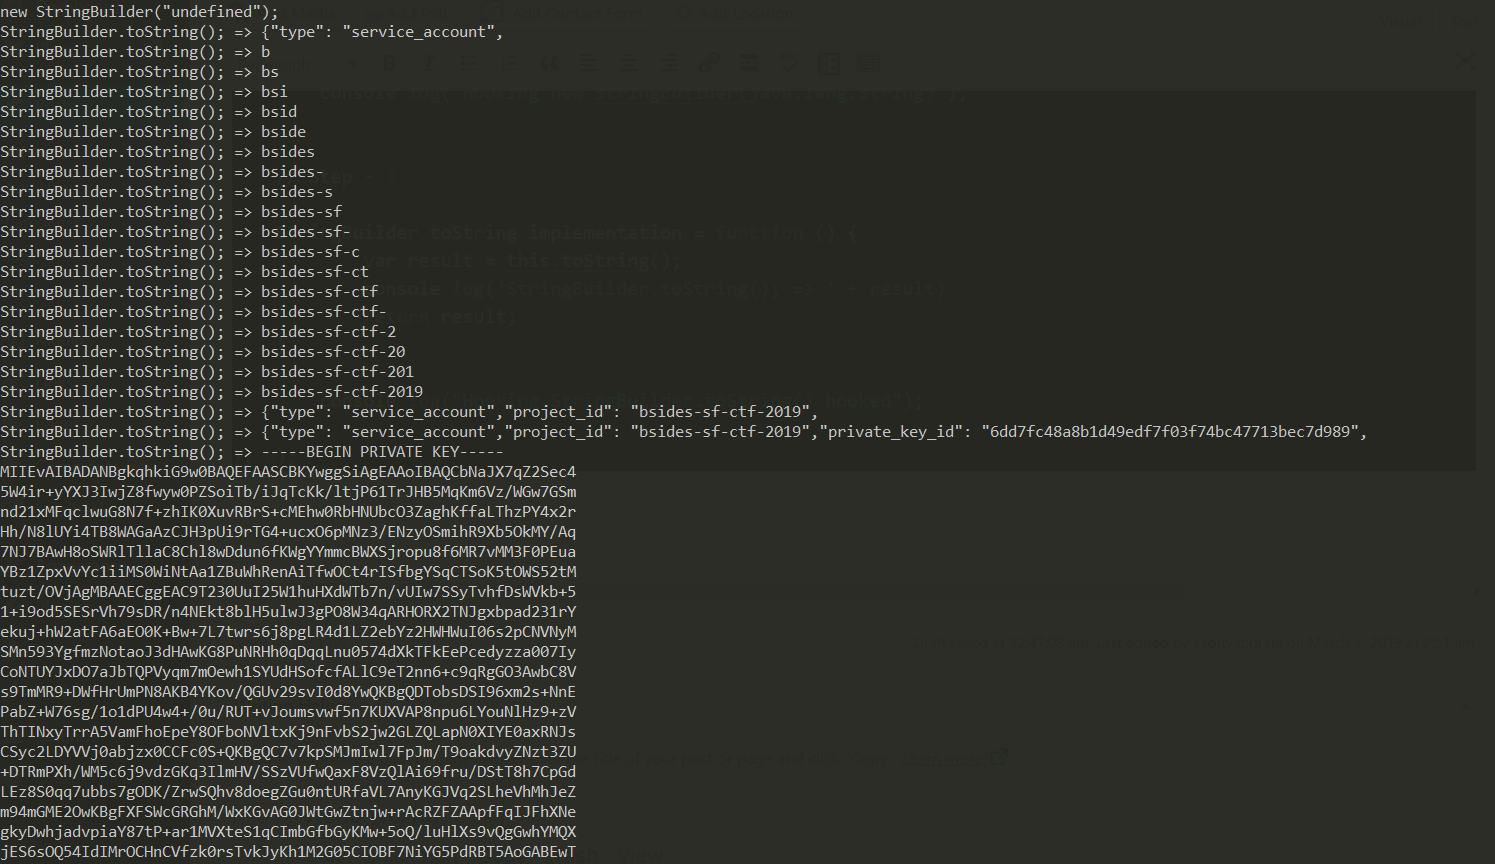
Now, we can monitor all the toString() calls, and finally at the end we see the complete JSON which comes from str4
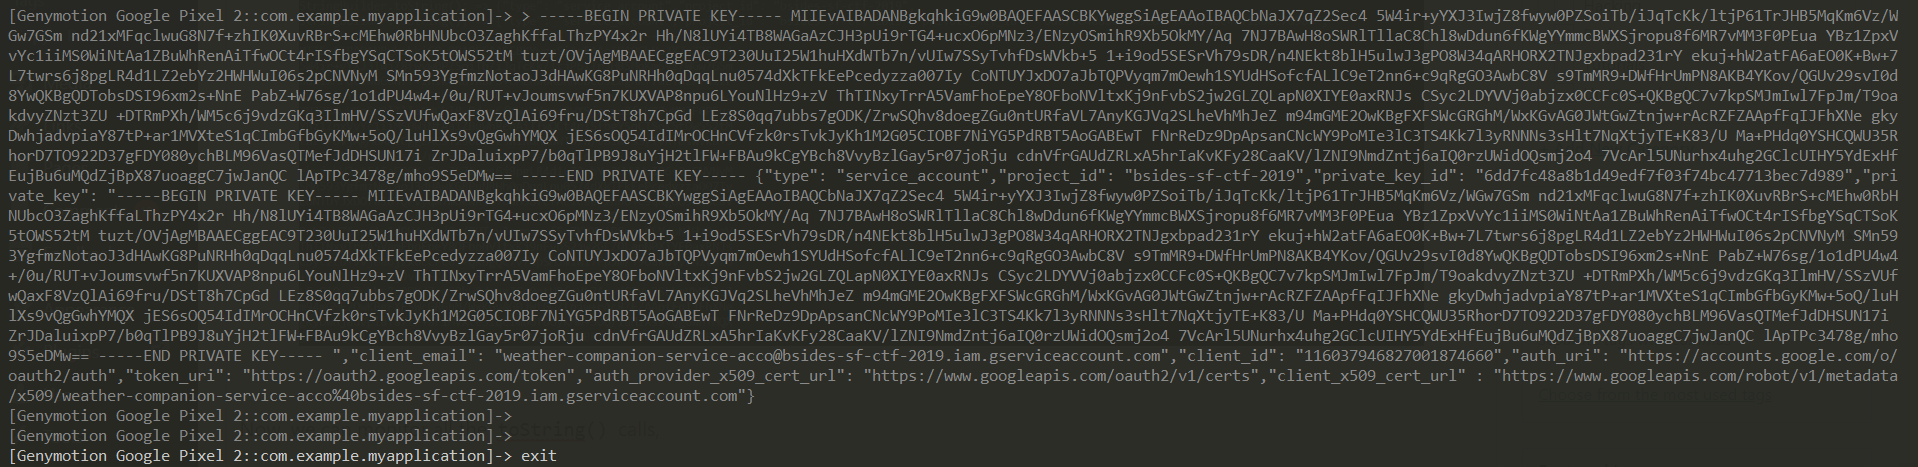
Hence, our overriding plan was successful. Now, we can use gsutil which can be used for access the Google Cloud Storage from command line. To install it, go here. After that is completed, we make sure our key.json follows RFC 4627 .
$  gcloud auth activate-service-account --key-file=key.json
Activated service account credentials for: [weather-companion-service-acco@bsides-sf-ctf-2019.iam.gserviceaccount.com]

$ gsutil ls -p bsides-sf-ctf-2019 gs://weather-companion
gs://weather-companion/flag.txt
gs://weather-companion/weather.json
So, now we can see the flag.txt in the cloud storage. Next, we can copy everything from the bucket
$ gsutil -m cp -r -p bsides-sf-ctf-2019 gs://weather-companion ./
And finally we can read the flag
Flag: CTF{buck3t_s3at5}
The code is here on my Github.
Closure
Thank you for taking out your time to read this. Follow me to @aaditya_purani for future updates and any questions.


Leave a comment